Works with Bricscad (Windows) Classic, Pro and Platinum, Bricscad (Linux) Classic and Pro
Inserts blocks, through a dialog box.
Accessing the Command
command bar: insert
aliases: i, ddinsert
menu bar: Insert | Insert Block
toolbar: Draw 2D | ![]()
status bar: Name
: insert
Displays a dialog box:
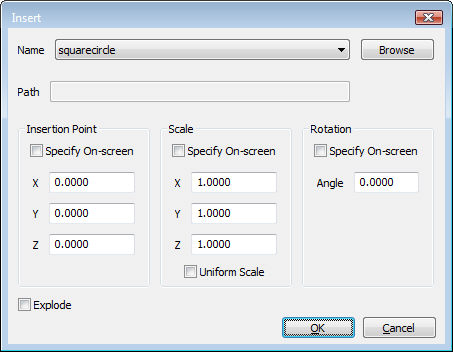
Enter options, and then click OK.
Command Options
|
Option |
Description |
|
Specifies the name of the block. The block can exist in the drawing, or be any DWG file:
Blocks are created with the Block command. |
|
|
Displays the Open dialog box. Choose a DWG file, and then click Open. |
|
|
Reports the path to the block, if opened from a DWG file. |
|
|
|
|
|
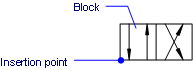
Specifies the insertion point of the block in the drawing.
|
|
|
Toggles where you specify the insertion coordinates:
Insertion point - specify the x,y or x,y,z coordinates of the block's lower left corner. |
|
|
Specifies the x coordinate of the block's insertion point. |
|
|
Specifies the y coordinate of the block's insertion point. |
|
|
Specifies the z coordinate of the block's insertion point. |
|
|
|
|
|
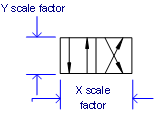
Scales the block:
|
|
|
Toggles where you specify the scale factors:
Scale factor - specify the scale factor. |
|
|
Specifies the scale factor along the x axis. Enter a negative value to mirror the block about the y axis. |
|
|
Specifies the scale factor along the y axis. Enter a negative value to mirror the block about the x axis. |
|
|
Specifies the scale factor along the z axis. |
|
|
Toggles whether or not the same scale factor is used for all:
|
|
|
|
|
|
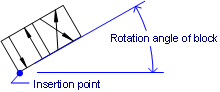
Specifies the rotation angle of the block about its insertion point:
|
|
|
|
Toggles where you specify the rotation angle:
Rotation angle - specify the angle. |
|
Specifies the rotation angle about the insertion point:
|
|
|
|
|
|
Toggles whether the block is inserted exploded:
|
|
Grips Editing
Blocks can be edited directly through grips:
Select the block. Notice that it has one grip located at the insertion point.
Drag the grip to move the block.

Related Commands
-Insert - insert blocks and prompts for attribute values through the command bar.
InsertAligned - inserts blocks repeatedly, and inserts mirrored blocks.
PasteBlock - pastes entities from the Clipboard as blocks.
AttDef - defines attributes through a dialog box.
-AttDef - defines attributes through the command bar.
Block and -Block - create blocks from attribute definitions and entities.
EAttEdit - edits attribute values and most properties.
Explode - reduces blocks to constituent entities and attributes to tags.
Properties - edits block and attribute values and properties.
RefEdit - edits blocks and attributes in-place.
| © Menhirs NV. All rights reserved. |