Open the Settings dialog.
In the Drawing settings category, expand the Entity Creation sub-category.
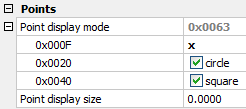
Expand the Points
settings group, then expand the Point
display mode setting.
Command: POINT
Since points are dimensionless, a single pixel should be the (nearly) correct representation on the screen. But this is hardly visible, especially in a complex drawing. Therefore you can choose between a number of possible display styles.
The point display style is chosen by means of the Point Display Mode (PDMODE) system variable. The size of the point representation style is controlled through the Point Display Size (PDSIZE) system variable.
Defining the point display settings
Open the Settings dialog.
In the Drawing settings category, expand the Entity Creation sub-category.
Expand the Points
settings group, then expand the Point
display mode setting.
|
|
|
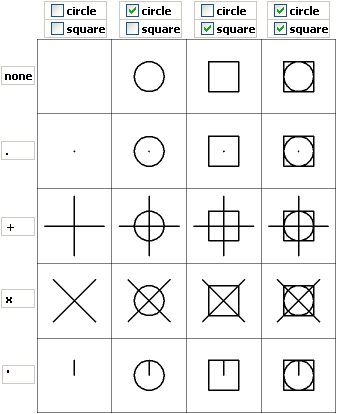
Point display modes |
Set the Point Display Mode setting:
Choose the point location marker style: point, none, X or |
Choose to add a circle and/or a square.
Set the Point Display Size setting.
Relative: Type 0 (zero) to scale the point display style at 5% of the screen.
Absolute: Type the size of the point display style in drawing units.
Close the Settings dialog.
|
NOTE |
If you need to draw a 'dot', use a Donut with a zero inside diameter instead of a point entity. |
Do one of the following
Click the Point
tool button (![]() ) on the Draw
toolbar.
) on the Draw
toolbar.
Choose Point in the Draw menu.
Type point in the command bar, then press Enter.
The command bar reads: Settings/Multiple/<Location of point>:
A prompt menu displays:

Specify the location of the point.
The point is created.
|
NOTE |
If the Point Display Size setting is set to 0 (zero), use the Regen tool to resize the display of the points to 5% of the screen size after zooming in or out. |
| © Menhirs NV. All rights reserved. |