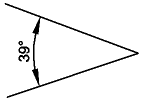
angular dimension measured between two lines
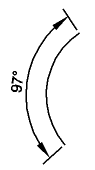
angular dimension of an arc
angular dimension defined by a vertex and two endpoints
Command: DIMANGULAR
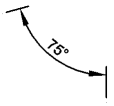
Angular dimensions annotate the angle measured between two lines, two linear segments of a polyline or the angle of a circular arc. You can also dimension an angle by selecting an angle vertex and two endpoints.
Starting from an existing angular dimension, you can add a baseline dimension or a continued dimension. An angular baseline dimension inserts an additional dimension from a common first extension line origin. An angular continued dimension continues an angular dimension from the second extension line of a previous angular dimension.
|
|
|
|
|
angular dimension measured between two lines |
angular dimension of an arc |
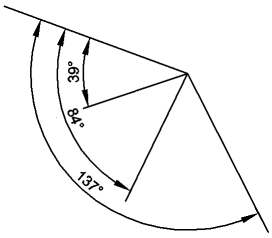
angular dimension defined by a vertex and two endpoints |
|
|
|
|
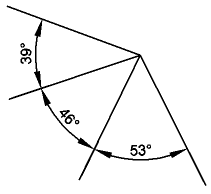
angular baseline dimensions |
angular continued dimensions |
To dimension an angle between two lines
Do one of the following
Click the Angular tool button (![]() ) on the Dimensions toolbar.
) on the Dimensions toolbar.
Choose Angular in the Dimensions menu.
Type dimangular in the command bar, then press Enter.
The command bar reads: Press Enter to specify angle/<select line, arc, or circle>:
Select the first line or line segment.
The command bar reads: Other line for angular dimension:
Select the second line or line segment.
The angular dimension displays dynamically.
The command bar reads: Angle/Text/<Location of dimension
arc>:
Do one of the following:
Position the dimension arc.
Type A and press Enter to define the angle of the dimension text, then position the dimension arc.
Type T and press Enter to modify the dimension text, then position the dimension arc.
To dimension an angle encompassed by an arc
Do one of the following
Click the Angular tool button (![]() ) on the Dimensions toolbar.
) on the Dimensions toolbar.
Choose Angular in the Dimensions menu.
Type dimangular in the command bar, then press Enter.
The command bar reads: Press Enter to specify angle/<select line, arc, or circle>:
Select the arc.
The angular dimension displays dynamically.
The command bar reads: Angle/Text/<Location of dimension
arc>:
Do one of the following:
Position the dimension arc.
Type A and press Enter to define the angle of the dimension text, then position the dimension arc.
Type T and press Enter to modify the dimension text, then position the dimension arc.
To create an angular dimension defined by a vertex and two endpoints
Do one of the following
Click the Angular tool button (![]() ) on the Dimensions toolbar.
) on the Dimensions toolbar.
Choose Angular in the Dimensions menu.
Type dimangular in the command bar, then press Enter.
The command bar reads: Press Enter to specify angle/<select line, arc, or circle>:
Right click or press Enter.
The command bar reads: Vertex of angle.
Specify the vertex of the angle.
The command bar reads: first side of angle.
Specify the endpoint of the first side of the
angle.
The command bar reads: Other side of angle.
Specify the endpoint of the second side of the
angle.
The angular dimension displays dynamically.
The command bar reads: Angle/Text/<Location of dimension
arc>:
Do one of the following:
Position the dimension arc.
Type A and press Enter to define the angle of the dimension text, then position the dimension arc.
Type T and press Enter to modify the dimension text, then position the dimension arc.
| © Menhirs NV. All rights reserved. |