Array

Works with BricsCAD (Windows) Classic, Pro and Platinum, BricsCAD (Linux) Classic, Pro and Platinum

Creates a polar or rectangular array of entities through a dialog box.

Accessing the Command

command bar:  array

alias:  ar

menu bar:  Modify | 2D Array

toolbar:  Modify |


: array

Displays a dialog box: (Fill out the settings, then click the OK button to create the array.)


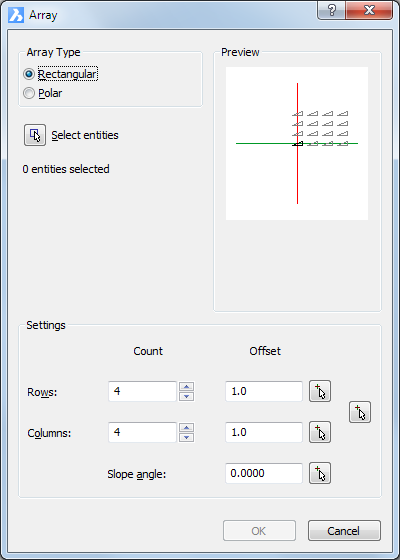
Rectangular array dialog box


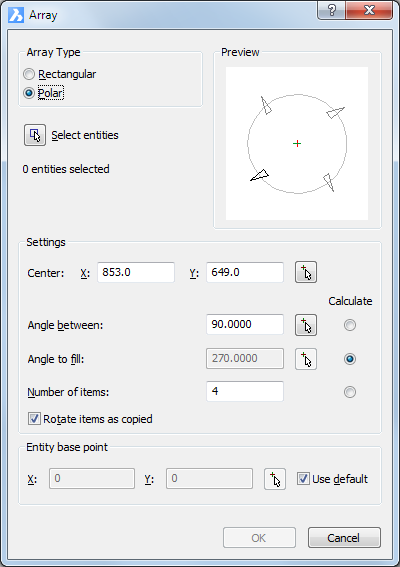
Polar array dialog box

Command Options

 Rectangular Array command options

Option

Description

Click the Select button () .

The Array dialog box temporarily closes.

You are prompted to select entities.

Rows Count

Specify the number of rows.

Rows Offset

Specify the offset between subsequent rows.

A positive offset adds rows from left to right.

Do one of the following:

  • Type a distance in the Rows Offset field.

  • Click the Pick Points button ().
    The Array dialog box temporarily closes.
    Prompts you: Vertical distance between rows:
    Specify two points in the drawing.

Columns Count

Specify the number of columns.

Columns Offset

Specify the offset between subsequent columns.

A positive offset adds columns from bottom to top.

Do one of the following:

  • Type a distance in the Columns Offset field.

  • Click the Pick Points button ().
    The Array dialog box temporarily closes.
    Prompts you: Horizontal distance between columns:  
    Specify two points in the drawing.

Spacing Rectangle

Specify a rectangle.

Rectangle length = Columns offset.

Rectangle width = Rows offset.

Click the Pick Points button ()
The Array dialog box temporarily closes.

Prompts you: Specify spacing rectangle:  
Specify two points in the drawing.

Slope Angle

Specify a rotation angle for the spacing rectangle.
The angle is calculated with respect to the current coordinate system.

Do one of the following:

  • Type an angle in the Slope angle field.

  • Click the Pick Points button ().
    The Array dialog box temporarily closes.
    Prompts you: Select angle of array:
    Specify two points in the drawing.

Polar Array command options

Option

Description

Click the Select button () .

The Array dialog box temporarily closes.

You are prompted to select entities.

Center

Specifies the center point of the array.

Do one of the following:

  • Enter coordinates in the X and Y fields.

  • Click the Pick Point button ().
    The Array dialog box temporarily closes.
    Prompts you: Base/Center of polar array:
    Specify a point in the drawing.

Angle between

Specifies the angle between each copy.

Do one of the following:

  • Click the Calculate radio button to calculate the angle from the Angle to fill and Number of items.

  • Type an angle in the Angle field.

  • Click the Pick Points button ().
    The Array dialog box temporarily closes.
    Prompts you: Specify angle between:
    A line displays dynamically from the current Center point.
    Specify a point in the drawing.

Angle to fill

Determines the extent and direction of the array.
Enter 360 for a full circle of copies; enter a smaller number to draw a partial polar array.
Enter a positive angle to draw the array counter clockwise; enter a negative number to draw the array clockwise.

Do one of the following:

  • Click the Calculate radio button to calculate the angle from Angle between and Number of items.

  • Type an angle in the Angle field.

  • Click the Pick Points button ().
    The Array dialog box temporarily closes.
    Prompts you: Specify angle between:
    A line displays dynamically from the current Center point.
    Specify a point in the drawing.

Number of items

Specifies the number of items in the array

Do one of the following:

  • Click the Calculate radio button to calculate the angle from the Angle between and Angle to fill.

  • Enter a number larger than 1.

Rotate items as copied

Determines whether copies are rotated when they are arrayed:

  • No does not rotate entities; all copies have the same orientation as the original.

  • Yes rotates copies.

Entity base point

Relocates the base point of the selected entities.

Do one of the following:

  • Check the Use Default option (= lower left corner of the selection set bounding box).

  • Click the Pick Point button ().
    The Array dialog box temporarily closes.
    Prompts you: Base/Center of polar array:
    Specify a point in the drawing.

Procedures

Creating a rectangular array

Creating a polar array

Related Commands

-Array - creates a polar or rectangular array of entities; displays prompts at the command bar.

3dArray - creates 3D arrays.

MInsert - inserts arrays of blocks.


© Menhirs NV. All rights reserved.