System Variables and User Preferences
 The Settings Dialog
Box
The Settings Dialog
Box
To see a complete list of all System variables:
-
Type setvar in the
command window followed by Enter.
The command bar reads: Variable name or ?:
-
Type ? (question
mark) in the command bar, then press Enter.
The command bar reads: Variable(s) to list <*>:
-
Press Enter.
The BricsCAD Prompt History window
opens, listing all variables and their current value.
To open the
Settings dialog
- Do one of the following:
- Click the Settings tool button (
 ) on the Standard
toolbar.
) on the Standard
toolbar.
- Choose Settings... in the Settings menu.
- Type settings
in the command bar, then press Enter.
- (option) Choose a display mode by clicking the
corresponding button in the Settings
toolbar.
Categorized
( )
)
Lists the settings by category: Drawing, Dimensions
and Program Options.
Alphabetical
( )
)
Lists the settings alphabetically.
- (option) Choose a category:
Drawing ( )
)
Opens the Categorized
view mode, with the Drawing tree
expanded.
Dimensions ( )
)
Opens the Categorized
view mode, with the Dimension tree
expanded.
Program Options
( )
)
Opens the Categorized
view mode, with the Program Options
tree expanded.
-
Use the search
field to find a
setting.
Understanding the Settings dialog
The Settings dialog gives you an
overview of all System variables and user preferences and their
current value.
Here you can:
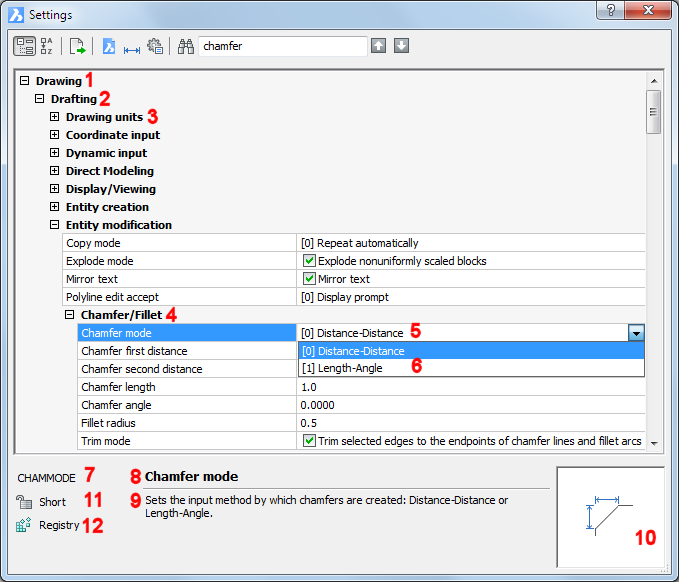
|
1
|
Class: Drawing, Dimensions or Program Options
|
|
2
|
Category (expanded)
|
|
3
|
Sub-category (expanded)
|
|
4
|
Group (expanded)
|
|
5
|
Current value of a system variable
|
|
6
|
Options list
|
|
7
|
Internal Name:
System variable names are fully capitalized:
LUNITS
User preference names are mixed case:
TemplatePath
You can type system variables and user preferences
in the command window to edit them or use the SETVAR command (system
variables only).
|
|
8
|
Variable Title
|
|
9
|
Variable Help
|
|
10
|
Preview (if available)
|
|
11
|
Settings Type ( = read-only; = read-only;  = user-defined) = user-defined)
|
|
12
|
Save location
= drawing
 = registry (system variable) ; = registry (system variable) ;  = registry (user preference) = registry (user preference)
 = not saved = not saved
|
To find settings
- Open the Settings
Dialog.
- (option) Click the Find
Options button (
 ) to open the open the Find
Setting dialog where you can set the search options.
) to open the open the Find
Setting dialog where you can set the search options.
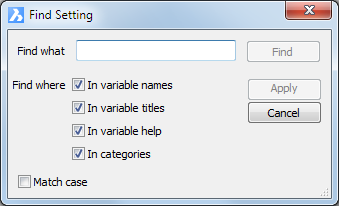
- Type the search string in the Search field.

The first setting matching the content of the search field
highlights.
- (option) Click the next (
 ) or previous (
 ) button to browse through the matching settings.
|
NOTE
|
If you check all Find
where options in step 2, it might take longer to find the
variable you are looking for, since more variables match the
content of the Find what field.
|
To edit settings
- Open the Settings
Dialog.
- Find a setting.
- Click the settings field to edit the setting.
- (option) Repeat steps 2 and 3 to edit more
settings.
- Close the Settings
window.
Editing
settings in the command bar
- Type the name of the system variable or user
preference in the command bar, e.g. autosnap
The command bar reads: New current value for
AUTOSNAP (0 to 63) <63>:
- Type the desired value in the command bar, then
press Enter.
|
NOTES
|
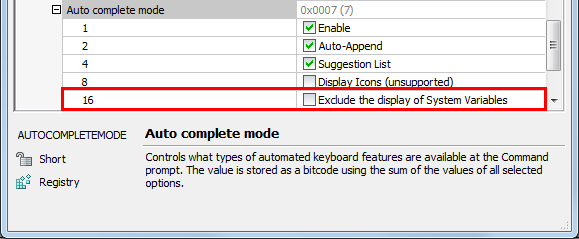
-
The value of some system variables is stored
as a bitcode using the sum of the values of all selected
options.
E.g.: The AUTOCOMPLETEMODE system variable has 5 options: 1 =
Enable, 2 = Auto-Append, 4 = Suggestion List, 8 = Display Icons (unsupported), 16 = Exclude the display of system variables.
When Enable, Auto-Append and Suggestion
List are selected the value of AUTOCOMPLETEMODE = 7 (1 + 2 +
4)
-
System variable names are recognized by the
Autocomplete feature of the command
bar if the Exclude the Display of System
Variables option of the AUTOCOMPLETEMODE system variable is not
checked.
|
To export settings
- Click the Export
tool (
 ) on the Settings toolbar.
The Export Settings window
opens.
- Type a name in the File
name field.
- Select a folder.
- Click the Save
button on the Export Settings
window.
All Settings are exported in a CSV (Comma Separated
Values) text file, which can be opened
in Microsoft® Excel®.
|
© Menhirs NV. All rights reserved. |