Ribbon Panel
Structure of the Ribbon Panel in the Customize dialog

A ribbon panel is composed of one or more rows. In a row you can add one or more command buttons or row panels, which in turn can hold one or more command buttons.
|
|
|
Ribbon Panel |
|
|
|
Structure of the Ribbon Panel in the Customize dialog |
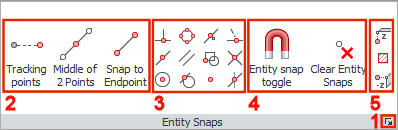
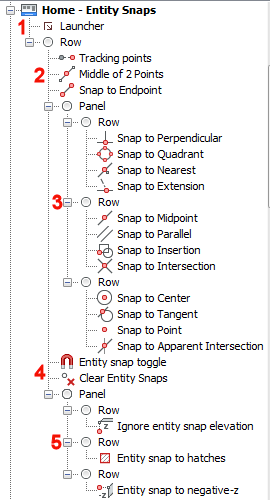
The Entity Snaps ribbon panel above is composed of:
a launcher (1)
a single row, holding three command buttons (2), a row panel (3) with three rows of four command buttons each, two command buttons (4) and a row panel (5) with three rows of one command each.
Command button (2): launches a command
Split button (1): groups a series of command buttons, much like a flyout toolbar.
Toggle button (3): toggles a setting; shows the current status of setting
Click the Ribbon tab on the Customize dialog.
Right click the Ribbon tabs group and choose Append ribbon tab in the context menu.
Fill out the fields in the Add Ribbon Tab dialog box:
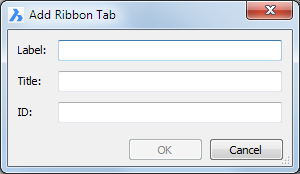
Label: Caption on the ribbon tab.
Title: Used in the Select Ribbon
Tab dialog when selecting ribbon tabs for a workspace (see
Editing a
Workspace).
ID: A unique name to identify the ribbon tab.
Click the OK button.
Click the Ribbon tab on the Customize dialog.
Expand the Ribbon tabs group.
Do one of the following:
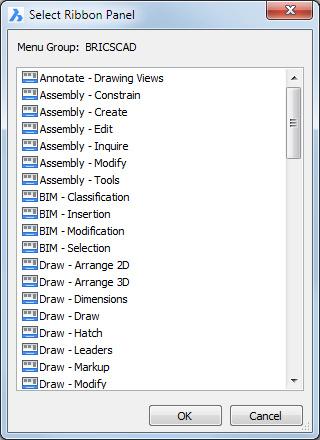
Right click the ribbon tab and choose Append panel in the context menu, to add a panel at the end.
Right click an existing panel and choose Insert panel in the context menu, to ad a panel above the existing panel.
Select the panel in the Select Ribbon Panel dialog, then click the
OK button.
(option) Drag the panel to a different position.
Select the panel.
Do one of the following:
Press the Delete key.
Right click and choose Remove in the context menu.
Click the Ribbon tab on the Customize dialog.
Right click the Ribbon Panels group and choose Append ribbon panel in the context menu.
Fill out the fields in the Add Ribbon Panel dialog
box:
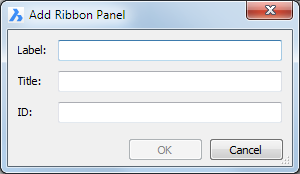
Label: Caption of the panel in the ribbon.
Title: Used in the Select Ribbon
Panel dialog when selecting the panels for a ribbon
tab
ID: A unique name to identify the ribbon panel.
Click the OK button.
Click the Ribbon tab on the Customize dialog.
Expand the Ribbon Panels group.
Expand the ribbon panel.
Do one of the following:
Right click the ribbon panel and choose
Append Row in the context menu.
The row is added at the bottom of the ribbon panel tree.
Right click an existing row and choose
Insert Ribbon Row in the context
menu.
The row is added above the existing row.
(option) Drag the row to a different location in the ribbon panel tree.
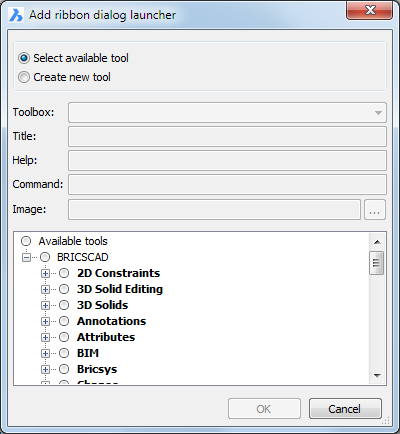
Right click the ribbon panel and choose Add launcher in the context menu.
Either select an available tool or Create a New
Tool, then click the OK
button.
Click the Ribbon tab on the Customize dialog.
Expand the Ribbon panels group.
Expand the ribbon panel.
Expand the ribbon rows and ribbon row panels.
Do one of the following:
Right click the row and choose Append Row Panel in the context menu.
The row panel is added at the bottom of the row tree.
Right click an existing row panel and choose
Insert Row Panel in the context
menu.
The row panel is inserted above the existing row panel.
Drag and drop a tool from the Available Tools list onto the row.
Drop the tool on the row to add a command button at the bottom of
the row tree.
Drop the tool on an existing command button to add a command button
above an existing command button.
Set the
Button Style in
the Command Button grid.
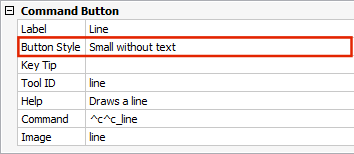
The options are:
|
Icon |
Style |
|
|
Small |
|
|
Small with text |
|
|
Large |
|
|
Large with text |
(option) Drag the command button to a different position in the same row or onto a different row.
Select the row, then right click and choose
Append split button in the context
menu.
The split button is added at the bottom of the row tree.
Drag a series of related tools from the Available Tools list onto the split button.
Set the Button
Style in the Split Button
grid.
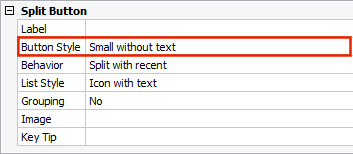
The options are:
| Icon | Style |
|
|
Small |
| Small with text | |
| Large | |
| Large with text |
Type a label text in the Label field.
(option) Set the Behavior to Split with recent (static text): always display the split button label, instead of the label of the most recently used tool.
(option) Drag the split button to a different position in the same row or onto a different row.
Drag and drop tools from the Available Tools list onto the split button.
Select the row, then right click and choose Append Toggle Button in the context menu.
Either select an available tool or Create a New
Tool, then click the OK
button.

The toggle button is added at the bottom of the row tree.
(option) Drag the toggle button to a different position in the same row or onto a different row.
Drag a control from the controls list onto the row.
Drop the control on the row to add it at the bottom of the row tree.
Drop the control on a existing command button to add it above the command button.
| © Menhirs NV. All rights reserved. |