Properties Bar
 How to find the
areas of lengths of objects - The Power of the Properties
Bar
How to find the
areas of lengths of objects - The Power of the Properties
Bar
Command: STATBAR
In the Properties Bar you can:
To open the Properties Bar
Do one of the following.
- Click the Properties tool button (
 ) on the Standard toolbar.
The pressed state of the tool button indicates that the Properties
bar is currently open.
Click the tool button again to close the Properties bar.
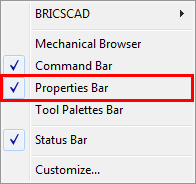
- Right click when the cursor is on a
toolbar.
A context menu displays.
The marked items in the context menu are currently open.
Select Properties Bar in the context
menu.
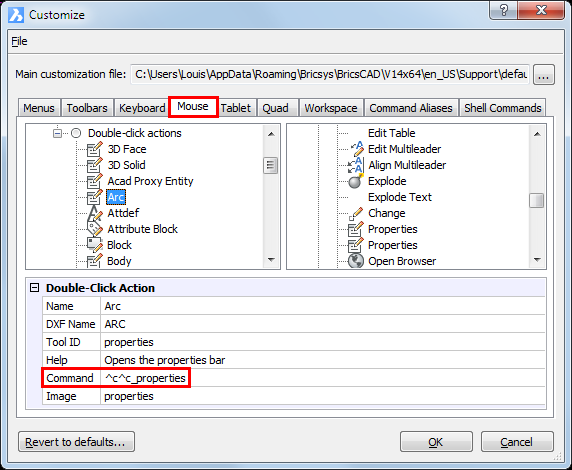
- Double click an entity.
The Properties Bar opens, showing the
properties of the selected entity.
Double clicking entities such as texts, blocks or polylines start
an editing command (See the Mouse tab
on the
Customize dialog).
- Click the Properties tool button () on the Standard
toolbar.
- Choose Properties in the Modify menu.
- Type properties in the command window, then press
Enter.
|
|
|
|
|
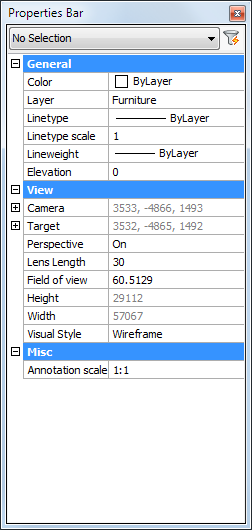
Properties Bar - No selection
The
current entity properties,
current Elevation, View
properties and
Annotation scale display
|
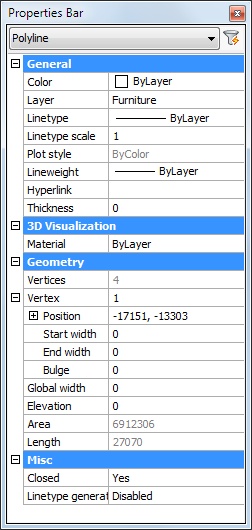
Properties Bar - Single entity selected
The
properties of the selected entity display
|
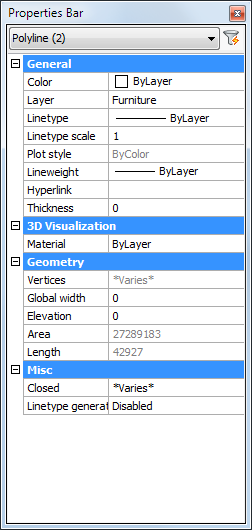
Properties Bar - Multiple entities selected
The
shared properties of the selected entities display
|
|
NOTE
|
The Properties Bar
can be either floating or docked.
To dock the Properties Bar, drag
it by its title bar to either the left or right hand side of the
BricsCAD application window.
|
|
NOTE
|
Read-only fields display in grey. The content of a read-only
field can be copied though. To copy a read-only field, click the
field, then press Ctrl C.
|
To adjust the size of
the Properties Bar
- Move the cursor over one of the edges of the
Properties Bar (1).
The cursor turns into a double-headed arrow.
- Press and hold the left mouse button to drag the
edge of the Properties Bar.
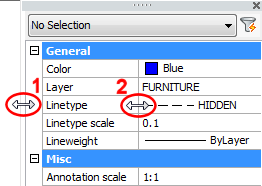
- Move the cursor over the boundary between the
Setting Names and the Setting Fields columns (2).
The cursor turns into a double-headed arrow.
- Press and hold the left mouse button to drag the
boundary.
|
NOTE
|
When docked, only the left (or right) edge of the Properties Bar is adjustable.
|
Setting the current properties in the
Properties Bar
- (option) Click on Color,
then click the down arrow button to select a color.
- (option) Click on Layer,
then click the down arrow to select a layer.
- (option) Click on Linetype.
then click on the down arrow to select a linetype.
- (option) Click on Linetype
scale,
then type the new value in the Linetype
scale field.
- (option) Click on Lineweight,
then click on the down arrow to select a lineweight.
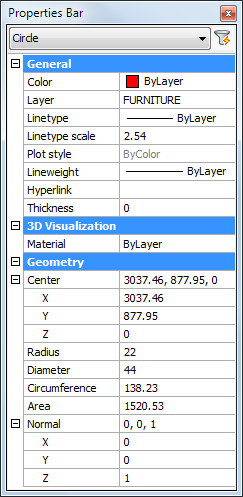
Edit the properties of a single entity
-
Select the entity.
The entity's properties display in the Properties Bar.
|
|
|
Properties of a circle
|
- Click the property you want to modify.
The settings field of the selected property is activated.
- Type a new value in the settings field of the
selected property or choose a setting from the list box, then press
the Enter key or select another
property.
The entity is updated.
- (option) repeat steps 2 and 3 to modify another
property.
- Press the Escape key
to stop.
|
NOTES
|
-
Properties of which the value displays in
grey cannot be modified.
-
Step 3: Properties (such as the General
properties), which are chosen from a list are updated
instantly.
|
To edit the endpoints of
a line
- Select the line.
- On the Properties
Bar, under Geometry, do one of
the following:
- Select the X-, Y- or Z- field, then enter a
value.
- Select either Start
point or End point.
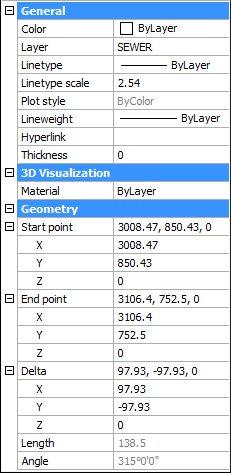
An X indicates the point being edited.
-
- Click the Pick
Point button (
 ).
).
- Specify the point in the drawing.
- Press the Escape key
to stop.
|
NOTE
|
This procedure also applies to edit the insertion point of
texts, images, blocks, Xrefs, ...
|
To edit the vertices of a polyline
- Select the polyline..
- On the Properties
Bar under Geometry, select
Vertex.
- Click the Next/Previous arrow buttons to select a
vertex.

An X indicates the vertex being edited.
- Do one of the following:
- Select the X- or Y- field, then enter a
value.
- Under Vertex
select Position and click the
Pick Point button (), then specify the point in the drawing.
- Press the Escape key
to stop.
Edit the shared properties of a
selection set
- Select the entities.
The shared properties display in the Properties Bar.
- Click the property you want to modify.
The settings field of the selected property is activated.
- Type a new value in settings field of the
selected property or choose a setting from the list box, then press
the Enter key or select another
property.
All selected entities are updated simultaneously.
- (option) Repeat steps 2 and 3 to modify another
property.
- Press the Escape key
to stop.
|
NOTES
|
-
*Varies* displays for shared properties which
are defined differently. If you edit such property, all entities in
the selection set will be equally defined for this property.
-
Step 3: Properties (such as the General
properties), which are chosen from a list are updated
instantly.
|
|
© Menhirs NV. All rights reserved. |