Works with Bricscad (Windows) Classic, Pro and Platinum, Bricscad (Linux) Classic and Pro
Edits polylines, 3D polylines, and 3D meshes (short for "polyline edit").
Accessing the Command
command bar: pedit
aliases: editpline, pe
menu bar: Modify | Edit Polyline
toolbar: Modify | ![]()
: pedit
Prompts you in the command bar:
Select polyline to edit: (Choose one polyline or polyface mesh.)
When a 2D polyline is selected, you are prompted:
Edit polyline: Edit vertices/Close/Decurve/Fit/Join/Linetype-mode/Reverse/Spline/Taper/Width/Undo/<eXit>: (Enter an option, or press Enter to exit the command.)
When a 3D polyline is selected, you are prompted:
Edit polyline: Edit vertices/Close/Decurve/Join/Reverse/Undo/<eXit>: (Enter an option, or press Enter to exit the command.)
When a 3D mesh is selected, you are prompted:
Edit polyline: Edit vertices/Desmooth/Mopen/Nclose/Undo/<eXit>: (Enter an option, or press Enter to exit the command.)
When a line, arc, circle or spline is selected, you are prompted:
The entity selected is not a polyline. Turn it into one? <Y> : (Press Enter to turn the selected entity into a 2D polyline.)
Edit polyline: Edit vertices/Close/Decurve/Fit/Join/Linetype-mode/Reverse/Spline/Taper/Width/Undo/<eXit>: (Enter an option, or press Enter to exit the command.)
Command Options
|
Option |
Description |
|
Chooses a single polyline, 3D polyline, or 3D mesh to edit. |
|
2D Polyline Option |
Description |
|
Edit vertices; prompts you: Edit vertices: Next/Previous/Angle/Break/Insert/Move/Regen/SElect/Straighten/Width/eXit/<Next> - enter an option. Bricscad displays a triangle marker at the start of the polyline, and an X marker at the current vertex.
Enter Next or Previous to move the marker from vertex to vertex. Alternatively, use the SElect option to select the vertex directly. |
|
|
Moves the X marker to the next vertex. When the marker reaches the last vertex of a closed polyline, it does not move to the "next' (first) vertex. |
|
|
Moves the X marker to the previous vertex. |
|
|
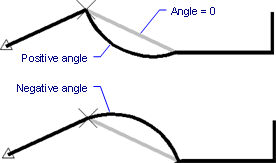
Changes the angle of the current segment:
Prompts you: Included angle for segment (>0 is ccw, 0 is straight, <0 is cw) <0> - enter an angle. |
|
|
Removes segments from the polyline; prompts you: Next/Previous/Select/Go/eXit/<Next> - enter an option. Bricscad marks the two vertices that define the segments to be removed with two X markers.
|
|
|
Next |
Moves the second X marker to the next vertex. |
|
Previous |
Moves the second X marker to the previous vertex. |
|
Select |
Moves second X marker directly to another vertex; prompts you: Select point along segment move to - pick a point on the polyline. Bricscad places the second X marker on the vertex nearest to the pick point. This option is faster than using Next and Previous. |
|
Go |
Erases the segments between two marked vertices.
This action turns:
This action cannot be undone. |
|
eXit |
Exits this sub-sub-option; returns to the previous prompt line. |
|
Inserts a vertex; prompts you: Location of vertex - pick a point for the new vertex. The drag line previews the location of the new vertex.
Bricscad adds the vertex and segment.
|
|
|
Moves the current vertex; prompts you: New location for vertex - pick point to move the vertex. The drag line previews the new location of the vertex.
Bricscad moves the vertex and associated segments.
It is easier to move vertices using grips. |
|
|
Regenerates the polyline to show changes made by the editing actions of this command. |
|
|
Moves X marker directly to another vertex; prompts you: Select point along segment to edit - pick a point on the polyline. Bricscad places the X marker on the vertex nearest to the pick point. This option is faster than using the Next and Previous options. |
|
|
Removes all segments between two vertices; prompts you: Straighten: Next/Previous/Select/Go/eXit - enter an option When you select the start and end points of an multi-segment polyline, the entire polyline is straightened, becoming a single segment; this also applies to closed polylines. |
|
|
Next |
Moves the second X marker to the next vertex. |
|
Previous |
Moves the second X marker to the previous vertex. |
|
Select |
Moves second X marker directly to another vertex; prompts you: Select point along segment move to - pick a point on the polyline. Bricscad places the second X marker on the vertex nearest to the pick point. This option is faster than using the Next and Previous options. |
|
Go |
Replaces the segments between the two marked vertices with a single segment.
This action cannot be undone. |
|
eXit |
Exits this sub-sub-option; returns to the previous prompt line. |
|
|
|
|
Changes the width of the current segment; prompts you: Enter new starting width - specifies the width at the starting end of the polyline. Enter new ending width - specifies the width at the polyline's end. The "current" segment lays between the X-marked vertex and the next vertex. |
|
|
Exits this sub-option; returns to the previous prompt line. |
|
|
|
|
|
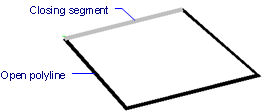
Closes the polyline by adding a segment between the start and endpoints.
When the polyline is closed, this option reads Open. |
|
|
Opens closed polylines by removing the last segment drawn to close the polyline. When the polyline is open, this option reads Close. |
|
|
Reverses the effects the Fit and Spline options. |
|
|
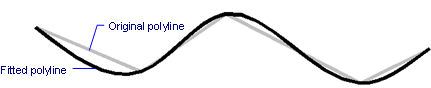
Fits a curve to the polyline.
To unfit the polyline, use the Decurve option. |
|
|
Adds lines, arcs, and polylines to the selected polyline; prompts you: Select entities - choose lines and arcs. This option works only with open polylines and with cojoined lines, polylines, and arcs; it does not work with traces. Cojoined means that the endpoints of entities meet, such as when drawn with ENDpoint object snap. The joined entities take on the source polyline's properties, such as color, width, and layer. |
|
|
Determines how linetype appear on polylines; prompts you: Linetype continuous along polyline: ON/OFF <OFF>:
(This option is related to the PLineGen system variable.) |
|
|
Reverses the direction of the polyline: the starting point is now its end point, and vice versa. The polyline does not change its look with this operation. This option affects operations that depend on the direction of a polyline, such as vertex editing. The polyline does not change its look with this operation, except that the triangle marker moves to the other end of open polylines. |
|
|
Converts the polyline into a spline.
All width information is lost; use the Width option to reapply width. The spline is a Bezier-spline whose smoothing is defined by the SplineType system variable. |
|
|
Tapers the width of the entire polyline from one end to the other; prompts you: Enter new starting polyline width - specify the width at the starting end of the polyline. Enter new ending polyline width - specify the width at the polyline's end.
|
|
|
Changes the width of all segments; prompts you: Enter new width for all segments - specify a width. This option overrides tapered widths.
|
|
|
Undoes the last action. |
|
|
Exits the command. |
|
|
3D Polyline Option |
Description |
|
Edit vertices; prompts you: Edit vertices: Next/Previous/Break/Insert/Move/Regen/SElect/Straighten/eXit/<Next> - enter an option. See polyline options, above. (The Angle and Width options are missing, because 3D polylines cannot contain arcs and cannot have width.) |
|
|
Closes open 3D polylines by adding a segment between the start and endpoints. When the 3D polyline is closed, this options reads Open. |
|
|
Open |
Opens closed 3D polylines by removing the last segment drawn to close the polyline. When the 3D polyline is open, this options reads Close. |
|
Reverses the effects the Fit and Spline options. |
|
|
Adds lines, arcs, and polylines to the selected polyline; prompts you: Select entities - choose lines and arcs. This option works only with open polylines and with cojoined lines, polylines, and arcs; it does not work with traces. Cojoined means that the endpoints of entities meet, such as when drawn with ENDpoint object snap. The joined entities take on the source polyline's properties, such as color, width, and layer. |
|
|
Reverses the direction of the 3D polyline: the starting point is now its end point, and vice versa. The 3D polyline does not change its look with this operation. This option affects operations that depend on the direction of a polyline, such as vertex editing. The polyline does not change its look with this operation, except that the triangle marker moves to the other end of open polylines. |
|
|
Undoes the last action. |
|
|
Exits the command. |
|
3D Polyface Mesh Option |
Description |
|
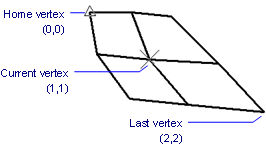
Moves vertices; prompts you: Edit vertex (0,0): Select/Next/Previous/Left/RIght/Up/Down/Move/REgen/eXit - enter an option. Bricscad displays a triangle marker on the home vertex (0,0) and an X marker on the current vertex.
It is easier to move vertices using grips. |
|
|
Select |
Moves X marker directly to another vertex; prompts you: Select point along segment to edit - pick a point on the mesh. Bricscad places the X marker on the vertex nearest to the pick point. This option is faster than using the Next and Previous options. |
|
Next |
Moves the X marker to the next vertex. When the marker reaches the last vertex, it does not move to the "next' (first) vertex. |
|
Previous |
Moves the X marker to the previous vertex. |
|
Left |
Moves the X marker to the vertex on the left. |
|
RIght |
Moves the X marker to the vertex on the right. |
|
Up |
Moves the X marker to the higher-numbered vertex. |
|
Down |
Moves the X marker to the lower-numbered vertex. |
|
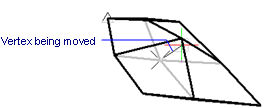
Move |
Moves the current vertex; prompts you: New location for vertex - pick a point to move the vertex. The drag line previews the new location of the vertex.
Bricscad moves the vertex and associated faces. |
|
REgen |
Regenerates the polyline to show changes made by the editing actions of this command. |
|
eXit |
Exits this sub-option; returns to the previous prompt line. |
|
|
|
|
Removes the Bezier-spline smoothing of 3D meshes. |
|
|
Closes the 3D mesh in the m direction:
When the mesh is closed, this option reads MOpen. |
|
|
Opens the 3D mesh in the m direction. When the mesh is closed, this option reads MClose. |
|
|
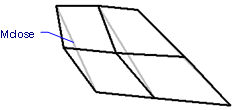
Closes the 3D mesh in the n direction:
When the mesh is closed, this option reads NOpen. |
|
|
Open the 3D mesh in the n direction. When the mesh is closed, this option reads NClose. |
|
|
Undoes the last action. |
|
|
Exits the command. |
|
Related Commands
PLine - draws polylines.
3dPoly - draws 3D polylines.
3dFace - draws 3D 4-edged faces with optional invisible edges.
3dMesh - draws 3D surface meshes of size m x n.
PFace - draws 3D multi-sided meshes.
| © Menhirs NV. All rights reserved. |