Parallel Perspective View
Visual Perspective View
Commands: DVIEW, PERSPECTIVE
The Define View command dynamically defines parallel perspective or visual perspective views of your 3D models.
The projection method of a view is controlled by the Perspective property of the view:
If ON, the view is a visual perspective view.
If OFF, the view is a parallel perspective view.
|
|
|
|
Parallel Perspective View |
Visual Perspective View |
The following parameters are used in the Define View procedure:
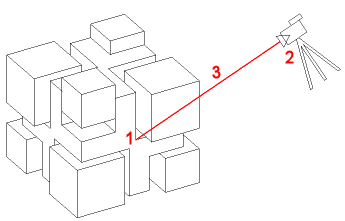
Target Point: Defines the center of the view (1)
Camera Point: Defines the view point and view direction (2).
Distance to Target: Distance between the camera position an the target point (3).
|
|
|
NOTE |
View manipulation tools, such as zoom, pan, real-time motion, are not available in visual perspective views. However, you can use the mouse to manipulate the view. |
Defining a perspective view
Switch to Plan view.
Do one of the following:
Click the Define
View tool button (![]() ) on the View toolbar.
) on the View toolbar.
Choose Define View in the View menu.
Type DV or dview in the command bar.
The command bar reads: Select entities or <use DVIEWBLOCK>:
Do one of the following:
Press Enter to
display the DVIEWBLOCK

Select the entities to include in the preview.
The command bar reads: Dview:
CAmera/TArget/TWist/Distance/POints/Clip/Off/Hide/PA/Zoom/<eXit>:
A prompt menu displays:

Do one of the following:
Choose XYZ Points in the prompt menu.
Type PO, then press Enter.
The command bar reads: Enter target point <current target point>:
Specify the specify the point using the mouse, or
enter x,y,z coordinates.
The command bar reads: Enter camera point <current camera
point>:
Specify the camera point using the mouse, or enter
x,y,z coordinates..
The view is rotated accordingly. The perspective type is
parallel.
Do one of the following:
Choose Distance to target in the prompt menu.
Type D, then press Enter.
The command bar reads: New camera-to-target distance <current distance>:
Do one of the following:
Press Enter to accept the current camera-to-target distance, as defined in steps 3 and 4..
Type a new camera-to-target distance, then press Enter.
The display switches to a visual perspective view.
Choose Exit in the
prompt menu
or type X, then press Enter to
conclude the Define View command.
(option) Save the view.
Do one of the following
Click the Perspective tool button (![]() ) on the View
toolbar.
) on the View
toolbar.
Choose Perspective in the View menu.
Type perspective in the command bar.
The command bar reads: New current value for
PERSPECTIVE (Off or On) <On>:
A prompt menu displays.
Do one of the following:
Type off or on in the command bar, then press Enter.
Choose Off or On in the prompt menu.
|
NOTE |
In named views you can set the Perspective property in the Drawing Explorer - Views dialog. |
| © Menhirs NV. All rights reserved. |