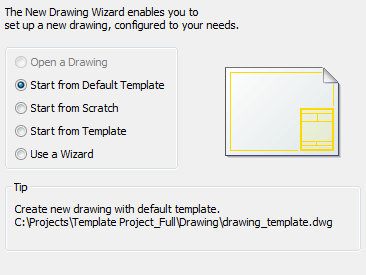
On the Create New
Drawing dialog choose Start from
Default template, then click the Next button.
The drawing is created as a copy of the default template.
Commands: NEW, NEWWIZ and QNEW
In Bricscad you can create new drawings:
Using a default template drawing.
Starting from scratch.
Using a template drawing of your choice.
Using a wizard.
Double clicking a *.dwt file in a Windows Explorer window.
To create a drawing using a default template drawing
Do one of the following:
Choose New wizard... in the File menu.
Type newwiz in the command window, then press Enter.
On the Create New
Drawing dialog choose Start from
Default template, then click the Next button.
The drawing is created as a copy of the default template.
Do one of the following:
Click the QNew
tool button (![]() ) on the Standard toolbar.
) on the Standard toolbar.
type qnew in the command bar, then press Enter.
The drawing is created as a copy of the default template defined by the BASEFILE system variable. If the default template drawing is not specified, the Create New Drawing wizard is launched if the STARTUP system variable is ON, otherwise the Select Template dialog displays.
To set the default template drawing
Open the Settings dialog.
Under Program Options / Files / Templates select Template (BASEFILE)
Click the Browse button.
On the Choose a File dialog, select a drawing file (*.dwg) or drawing template (*.dwt), then click the Open button.
To create a drawing from scratch
Do one of the following:
Choose New wizard... in the File menu.
Type newwiz in the command window, then press Enter.
On the Create New
Drawing dialog choose Start from
Scratch, then click the Next
button.
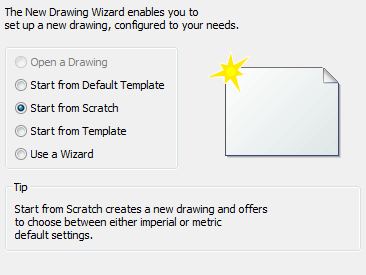
Choose between either Imperial or Metric default settings.
Click the Finish button to create the drawing.
|
NOTE |
Using the above procedure it depends on the status of the BASEFILE and PSTYLEPOLICY variables whether CTB (Color table) or STB (Named plot style table) will be used to set up plotter configurations in the newly created drawing.
|
Open the Settings dialog.
Under Program Options / Plot and publish select Plot style policy (PSTYLEPOLICY).
Do one of the following:
Choose Associate an entity's plot style with its color for Color dependent plot styles.
Choose No association between color and plot style for Named plot styles.
To create a drawing using a template drawing
Do one of the following:
Choose New wizard... in the File menu.
Type newwiz in the command window, then press Enter.
On the Create New
Drawing dialog choose Start from
template, then click the Next
button.
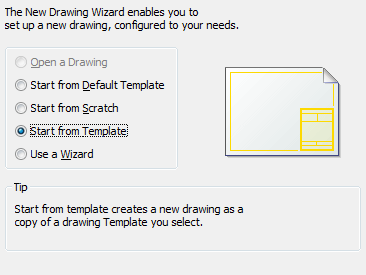
Do one of the following:
Choose a template drawing in the Select a template list.
By default this is the content of the Template folder in the Local
root folder.
Edit the Template Path variable to
set your template folder differently.
Click the Browse... button to select a template
drawing.
You can choose between *.dwg and
*.dwt file types.
The drawing is created as a copy of the selected template.
To create a drawing using the New command
Do one of the following:
Choose New... in the File menu.
Type new in the command bar, then press Enter.
The Select template dialog opens showing the content of the Template folder as defined in the Template Path variable.
Select the template drawing, then click the
Open button.
The drawing is created as a copy of the selected template.
To set the Template Path variable
Open the Settings dialog.
Under Program Options / Files / Templates select Template Path (templatePath)
Click the Browse button.
On the Browse for folder dialog, select a folder , then click the OK button.
To create a drawing using a wizard
Do one of the following:
Choose New wizard... in the File menu.
Type newwiz in the command window, then press Enter.
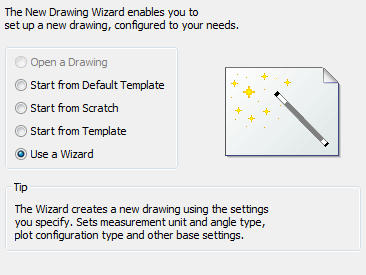
On the Create New
Drawing dialog choose Use a
Wizard, then click the Next
button.
Select the Unit of
measurement and the display Precision, then click the Next button.

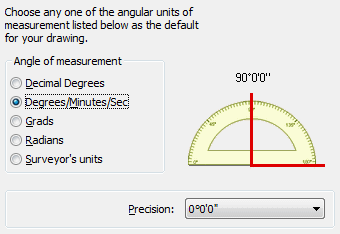
Select the Angle of
measurement and the display Precision, then click the Next button.
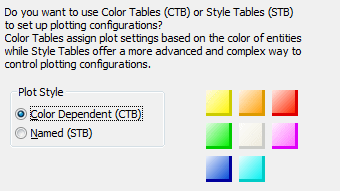
Choose between Color
Dependent plot styles (CTB) or Named plot styles (STB), then click the
Next button.
Select the default Color and Linetype.

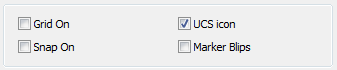
Define the Grid,
Snap, UCS
icon and Marker Blips
settings.
Click the Finish button to create the drawing.
(option) Choose Save As... in the File menu to save the drawing as a template in the Templates subfolder of the Local root folder.
| © Menhirs NV. All rights reserved. |