Commands: TABLE, -TABLE, TABLEDIT, TABLEEXPORT, TABLEMOD, TABLESTYLE
A table is an entity that is composed of rows and columns, much like a Microsoft Excel spreadsheet. A table entity can be created as an empty table or you can import data from a CSV (Comma Separated Values) file. The appearance of the table text and gridlines is controlled with a table style. Table styles are saved in the DWG file.
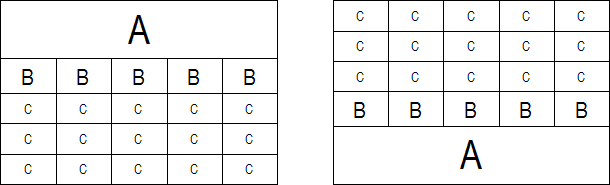
A default table consists of a Title cell (A), a row of Header cells (B) and one or more rows of Data cells (C).
A table can have one of two directions: Down (title row at the top) or Up (title row at the bottom).
Table with a Down direction (left) and a Up direction (right).
Do one of the following:
Click the Table
tool button (![]() ) on the Draw 2D toolbar.
) on the Draw 2D toolbar.
Choose Insert Table... in the Draw menu.
Type table in the command bar, then press Enter.
The Insert Table dialog displays:
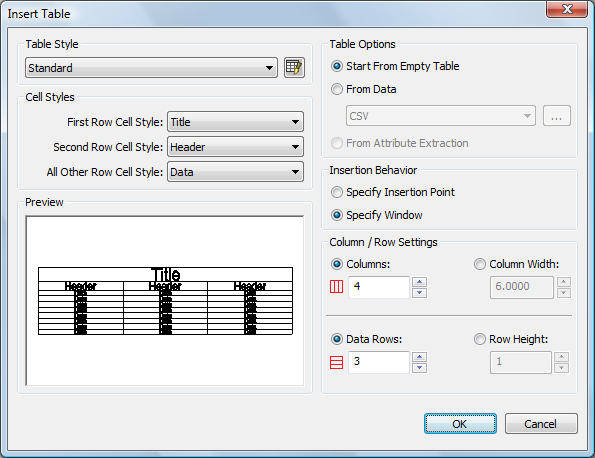
Choose a Table Style from the Table Style list.
(option) Set the cell style for the first, second
and other rows.
By default the cell style for the first row is Title, the cell style for the second row is
Header and the cell style for the
other rows is Data.
Under Table Options, choose Start from Empty Table.
Under Insertion Behavior do one of the following:
Choose Specify Insertion Point, then specify the number of columns and the column width and number of data rows and the row height.
Choose Specify Window, then do one of the following:
Specify the number of columns and data rows.
Specify the column width and the row height.
Specify the column width and the number of data rows.
Specify the number of columns and the row height.
Click the OK
button.
Depending on your choice in step 5 you are prompted to specify an
insertion point or a window.
The table is created and the Text
Formatting toolbar displays (see
Create multiline text).
Do one of the following:
Start adding text in the table (see Edit the table content).
Click outside the table to close the Text Formatting toolbar.
When importing data from a CSV (Comma Separated Values) file, please make sure the list separator character on your system is the same as the one used in the CSV file (see Defining the list separator character).
Do one of the following:
Click the Table
tool button (![]() ) on the Draw 2D toolbar.
) on the Draw 2D toolbar.
Choose Insert Table... in the Draw menu.
Type table in the command bar, then press Enter.
The Insert Table dialog displays.
Choose a Table Style from the Table Style list.
Under Table Options, choose From Data.
Click the Browse button (![]() ).
).
The Open dialog displays.
Choose a CSV file, then press the Open button.
Click the OK button on the Insert Table dialog.
The dialog box closes and the table is attached to the cursor.
Click a point in the drawing to place the
table.
The table is created and the Text
Formatting toolbar displays (see
Create multiline text).
Do one of the following:
Start editing the text in the table (see Edit the table content).
Click outside the table to close the Text Formatting toolbar.
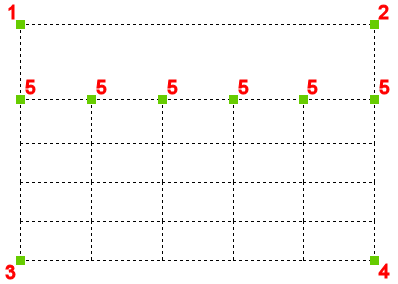
(option) Select the table and drag the grips to adjust the dimensions of the table.
When a table is selected, multiple grips display:
Moves the table.
Modifies the width uniformly.
Modifies the height uniformly.
Modifies the width and height uniformly.
Modifies the width of a column.
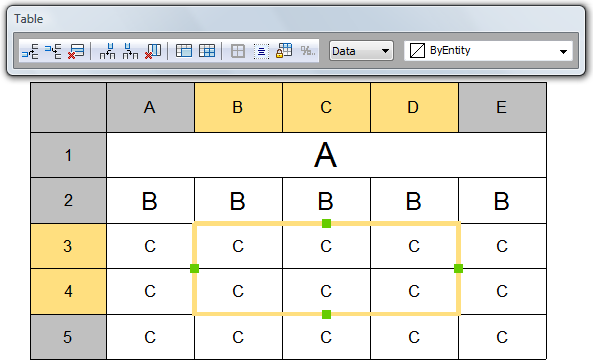
Editing a table using the Table toolbar
To open the Table toolbar, do one of the following:
Click the cell you want to edit.
Press and hold the left mouse button then define a rectangle to select multiple cells
Column letters and row numbers display.
The column(s) and row(s) of the selection hightlight.
A rectangle with four handles is drawn around the selection.
Do one of the following:
Click a cell to select it.
Press and hold the left mouse button, then drag the cursor to select multiple cells.
(option) Drag the grips of the selection to modify the dimensions.
(option) Click a tool in the Table toolbar.
(option) Right click to display a context menu:
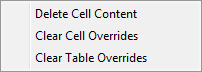
Delete Cell Content: deletes the text in the selected cells.
Clear Cell Overrides: resets all cell properties of the selected cells to the Cell Style settings as defined in the Table Style.
Clear Table Overrides: resets all cell properties of all cells to the Cell Style settings as defined in the Table Style.
|
Icon |
Tool name |
Description |
|
|
Insert row above |
Inserts an empty row above the selection. |
|
|
Insert row below |
Inserts an empty row below the selection. |
|
|
Delete row |
Deletes the row(s) of the selection. |
|
|
Insert column left |
Inserts an empty column at the left of the selection. |
|
|
Insert column right |
Inserts an empty column at the right of the selection. |
|
|
Delete column |
Deletes the column(s) of the selection. |
|
|
Merge |
Merges the selected cells. |
|
|
Unmerge |
Splits previously merged cells. |
|
|
Border style |
Sets the border style of the selection (not implemented yet). |
|
|
Text alignment |
Sets the text alignment of the selection. |
|
|
Lock / Unlock |
Locks / Unlocks the selection. |
|
|
Set cell format |
Sets the cell format of the selection (not implemented yet) |
|
|
Set cell style |
Sets the style of the selected cells: Title, Header or Data. |
|
|
Set cell background |
Sets the background color of the selection. |
(option) Repeat steps 3 and 4 to continue editing the table.
(option) Double click a cell to edit the cell text.
(option) Do one of the following:
Click another cell.
Press and hold the left mouse button, then drag the cursor to select multiple cells.
Click outside the table to close the Table toolbar.
Editing a table in the Properties bar
Click one of the grid lines.
The properties of the table display in the Properties bar.
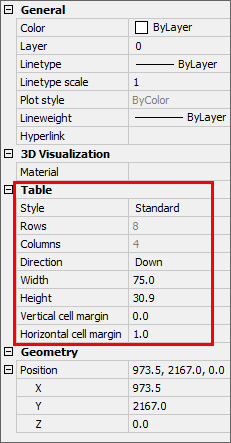
(option) Apply a different Table style.
(option) Change the table direction.
(option) Modify the width and/or height of the table.
(option) Modify the vertical and/or horizontal cell margins.
Press the Esc key to stop editing the table.
Editing a cell in the Properties bar
Click the cell.
The properties of the cell display in the Properties bar.
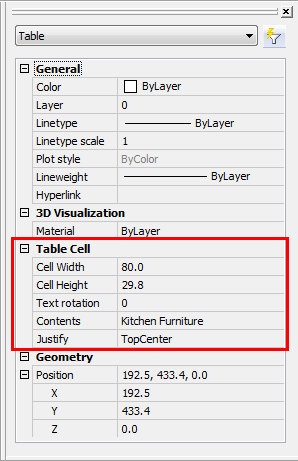
(option) Modify the width and/or height of the
cell.
The width and height of the column and/or row of the cell are
changed.
(option) Modify the text rotation.
The options are: 0°, 90°, 180° and 270°.
(option) Edit the cell content.
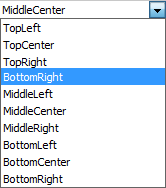
(option) Choose a different text alignment option.
Do one of the following:
Double click the cell you want to edit.
Type tabledit in the command bar, then press Enter and click the cell you want to edit.
The Text Formatting toolbar displays above the selected cell (see Create multiline text).
Edit the text in the cell.
(option) Press Alt + Enter to create a second line in the same
cell.
To edit another cell:
Press the TAB key to go to the next cell in the same row.
Press Shift + TAB to go to the previous cell in the same row.
Press Enter to go the next cell in the same column.
Press Shift + Enter to go to the previous cell in the same column.
Press one of the Arrow keys.
Click to stop editing the table content.
When exporting data to a CSV (Comma Separated Values) file, the list separator character off your system is used in the CSV file (see Defining the list separator character).
Type tableexport in
the command bar, then press Enter.
The command bar reads: Select table to export:
Click the table you want to export the data of.
The Export Data dialog opens.
Select a folder to save the data in.
Type a name in the File name field.
Click the Save
button.
The data in the selected table are saved as a CSV (Comma Separated
Values) file.
Defining the list separator character
Click the Start button in the Windows Taskbar, then choose Control Panel.
Do one of the following:
On the Control Panel Home window, choose: Clock, Language and Region > Regional and Language Options.
On the Control Panel Classic View window, double click the Regional and Language Options icon.
The Regional and Language Options dialog box displays.
On the Regional and Language Options dialog box click the Customize this format... button.
The Customize Regional Options dialog box displays:
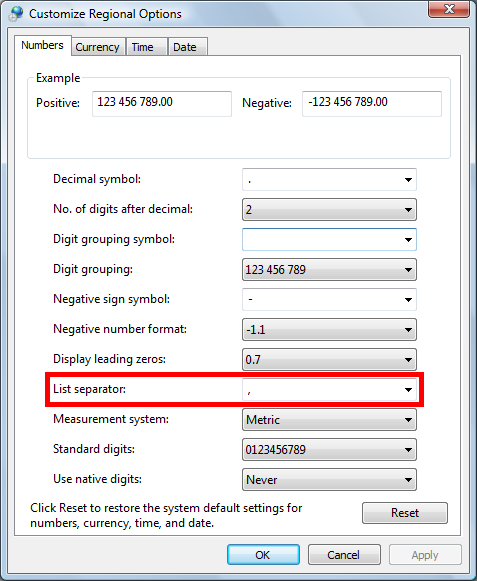
On the Numbers page of the Customize Regional Options dialog box, go to List separator, then click the down arrow and select either comma (,) or semicolon (;).
Click the OK button on the Customize Regional Options and Regional and Language Options dialog boxes.
| © Menhirs NV. All rights reserved. |