Commands: 2DINTERSECTION, 3DINTERSECTION, NEAREST, CENTER, ENDPOINT, EXTENSION, FROM, INSERTION, INTERSECTION, MIDPOINT, MTP, NONE, PARALLEL, PERPENDICULAR, POINT, QUADRANT, TANGENT
Entity snaps enable you to quickly select exact geometric points on existing entities without having to know the exact coordinates of those points. With entity snaps, you can select the end point of a line or arc, the center point of a circle, the intersection of any two entities, or any other geometrically significant position. You can also use entity snaps to draw entities that are tangent or perpendicular to an existing entity. You can use entity snaps any time you need to specify a point.
You can work with entity snaps in one of two ways
Enable a running entity snap that remains in effect until you turn it off by choosing an entity snap when no other command is active.
Enable a one-time entity snap for a single selection by choosing an entity snap when another command is active. You can also use a one-time entity snap to override a running entity snap.
When using entity snaps, the program recognizes only visible entities or visible portions of entities. You cannot snap to entities on layers that have been turned off or to the blank portions of dashed lines.
If the APBOX system variable is on, the entity Snap Aperture Box is added to the crosshairs when one or more entity snaps are active.
When you move the cross hairs, the program snaps to the snap point closest to the center of the Snap Aperture Box. The Snap Marker indicates the current snap point.
|
NOTE |
Press the TAB key, without moving the mouse, to cycle through all possible entity snaps. If the DYNMODE variable has a positive value (Dynamic Dimensions switched ON) entity snap cycling is not possible. Click the DYNMODE field in de Status Bar to toggle the display of dynamic dimensions. |
To define the Entity Snap settings
Open the Settings dialog.
In the Settings dialog, expand the Program Options settings class.
Under Program Options expand the Display settings group, then scroll down to the Entity Snap settings.
Under Drawing expand the Drafting settings group then go to Coordinate Input > Entity Snaps.
Define the Entity
Snap settings.
|
User Preference |
Title |
Description |
|
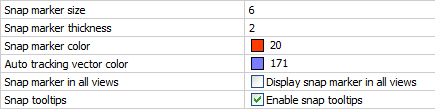
SnapMarkerSize |
Snap marker size |
Sets the size of the snap marker. (default size is 6) |
|
SnapMarkerThickness |
Snap marker thickness |
Sets the thickness of the snap marker. (default thickness is 2) |
|
SnapMarkerColor |
Snap marker color |
Sets the color of the snap marker. (default color = 20) |
|
DisplaySnapMarkerInAllViews |
Snap marker in all views |
If multiple viewports are open, enables the display of the snap marker in all viewports. |
|
DisplayTooltips |
Snap tooltips (3) |
Enables the display of the Entity Snap tooltips. |
|
System Variable |
Title |
Description |
|
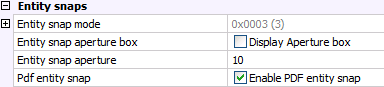
OSMODE |
Entity snap mode |
Sets the entity snap modes and toggles entity snap on/off. |
|
APBOX |
Entity snap aperture box |
Toggles the display of the aperture box (2). |
|
APERTURE |
Entity snap aperture |
Sets the size of the Autosnap aperture box. (default size is 10) |
|
PDFOSNAP |
Pdf entity snap |
Enables snapping to the geometry in pdf underlay files. |
|
NOTE |
You can toggle the Entity Snaps on/off by clicking the ESNAP field in the Status Bar. |
Do one of the following:
Click the buttons on the Entity Snaps toolbar.
The buttons of the currently active entity snap modes are
pressed.

Press and hold the Shift key, then right
click and select the Entity Snap mode in the context menu.
The icons of the currently active Entity Snap modes are
outlined.
When no command is active, the above procedures toggle the Entity Snap modes on/off.
When a command is active, the above procedures set a 'one shot' override of the current Entity Snap modes.
|
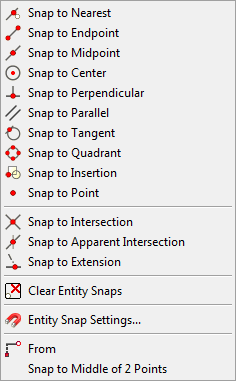
Name |
Icon |
Marker |
Description |
|
|
|
Snaps to the nearest point on an entity. |
|
|
|
|
Snaps to the nearest endpoint of an entity or polyline segment. |
|
|
|
|
Snaps to the midpoint of an entity or polyline segment. |
|
|
|
|
Snaps to the center point of an arc, circle, polygon, ellipse or elliptical arc. Snaps to the center of gravity of a closed polyline. |
|
|
|
|
Snaps to the perpendicular point of another entity. You can snap to an arc, circle, ellipse, line, polyline, infinite line, ray, spline or edge of a plane to form a perpendicular alignment with that entity or with an extension of that entity. |
|
|
|
|
Displays a tracking line parallel to the selected entity. |
|
|
|
|
Snaps to the point on an arc, ellipse, spline or circle that, when connected to the previous point, forms a line tangent to that entity. |
|
|
|
|
Snaps to the closest quadrant of an arc, circle, ellipse, or elliptical arc. |
|
|
|
|
Snaps to the insertion point of an attribute, block or text entity. |
|
|
|
|
Snaps to a point entity. |
|
|
|
|
Snaps to the intersection of any combination of entities. |
|
|
|
|
Snaps to the apparent intersection in the current view of two entities that do not intersect in three-dimensional space. |
|
|
|
|
Snaps to the extension of an entity or to the intersection of the extension of two entities. |
|
|
|
|
Turns off all entity snap modes. |
|
|
|
|
Prompts for a base point. Use relative coordinates to define the offset from the base point. |
|
|
|
|
Snaps to a point in the middle between two points. |
Working with multiple Entity Snap modes
Move the cursor to the entity you want to snap.
One of the active Entity Snap modes markers display.
Do not move the mouse; press the TAB key.
The entity the snap point is on highlights.
Do one of the following:
Click to accept the snap point.
Press the TAB key.
The next possible Entity Snap mode marker displays.
The entity the snap point is on highlights.
(option) Repeat step 3 until the right snap point is found.
|
NOTES |
|
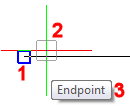
To snap to the extension of two entities
If not already on, turn on the Extension Entity Snap mode (![]() ).
).
Launch a drawing tool, e.g. Draw Line.
Move the cursor over the endpoint of the first
entity (1).
A small cross (![]() ) indicates the entity is
marked for extension.
) indicates the entity is
marked for extension.
Move the cursor over the endpoint of the second
entity (2).
A small cross (![]() ) indicates the entity is
marked for extension.
) indicates the entity is
marked for extension.
Move the cursor near the intersection of the
extensions of the two entities.
An X indicates the intersection (3).
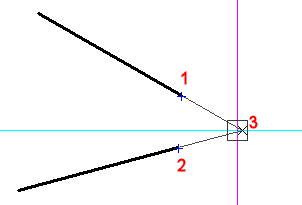
Click to accept the snap point.
|
NOTE |
You can snap to the extension of lines, polylines, arcs and elliptical arcs |
The From entity snap option allows to define an offset from an entity snap point.
When executing a drawing or modifying command, do one of the following:
Click the From
tool (![]() ) button on the Entity Snaps toolbar.
) button on the Entity Snaps toolbar.
Type from in the command bar, then press Enter.
Press Shift, then right click and choose From in the context menu.
The command bar reads: Base point:
Identify the base point.
The command bar reads: Base point: offset or regular point:
Type the offset, from the base point as relative coordinates: @x,y,(z).
|
NOTE |
Use polar tracking to type the distance from the base point (see: Direct distance entry). |
Using the Parallel entity snap
Launch an entity create command to create a linear entity (e.g. Line).
Specify the first point of the entity.
The line displays dynamically.
Do one of the following:
Press and hold the Shift key, then right click and choose Snap to parallel in the context menu.
Click the Snap to
parallel toolbutton (![]() ) in the Entity Snaps toolbar.
) in the Entity Snaps toolbar.
Hover the cursor over the entity you want to draw
parallel to.
The Parallel Entity Snap marker
(![]() ) displays on the selected entity.
) displays on the selected entity.
Wait until a small cross (+)
indicates the entity is recognized.
Move the cursor in order to place the dynamics of
the line more or less parallel to the selected entity.
A tracking line displays from the start point of the line.
Do one of the following to specify the second point while the tracking line displays:
Click a point.
Enter the desired length and press Enter.
Use a second entity snap tracking point, then move the cursor to the intersection of the parallel tracking line and the second entity snap tracking line.
When prompted to specify a point, do one of the following:
Type mtp or m2p in the command bar, then press Enter.
Press and hold the Shift key, then right click and choose Snap to middle of 2 points in the context menu.
The command bar reads: First point of mid:
Specify the first point
The command bar reads: Second point of mid:
Specify the second point.
The point in the middle of the two points is snapped.
| © Menhirs NV. All rights reserved. |