Do one of the following:
Click the Create
Block tool button (![]() ) on the Tools toolbar.
) on the Tools toolbar.
Choose Create Block in the Tools menu.
Type block in the command bar, then press Enter.
Commands: BLOCK, -BLOCK, WBLOCK and PASTEBLOCK
The Block command groups entities into a block using a dialog box. The -Block commands prompts you in the command bar.
The Wblock command writes blocks and other drawing parts to a separate drawing file (short for "write block").
The Pasteblock command pastes entities from the Clipboard as a block in the current drawing (see Paste a selection as a block).
General procedure to create a block
Specify the name.
Specify the insertion point.
The insertion point is the base point for the block and serves as
the reference point when you later insert the block into a
drawing.
Select entities.
To create a block in a drawing
Do one of the following:
Click the Create
Block tool button (![]() ) on the Tools toolbar.
) on the Tools toolbar.
Choose Create Block in the Tools menu.
Type block in the command bar, then press Enter.
The Block Definition dialog displays:
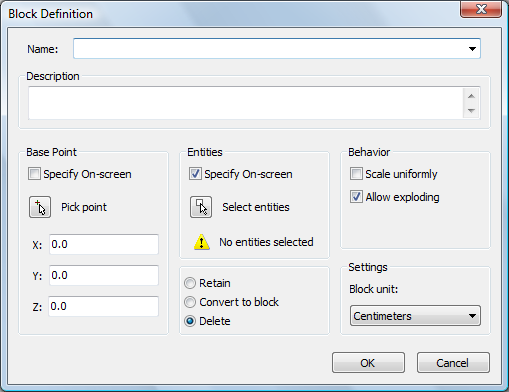
Type a name for the new block in the Name field.
Do one of the following to specify the Base Point:
Check the Specify
On-screen option.
You will be prompted to specify the base point after clicking the
OK button.
Click the Pick
point button (![]() ).
).
The Block Definition dialog closes
temporarily to let you pick a point in the drawing.
Type the coordinates of the base point in the X-, Y- and Z-field.
Do one of the following to select the entities to be included in the block definition:
Check the Specify
On-screen option.
You will be prompted to select the entities after clicking the
OK button.
Click the Select
entities button (![]() ).
).
The Block Definition dialog closes
temporarily to let select the entities in the drawing.
Set the block properties:
Scale uniformly: if checked, the X-, Y- and Z-scaling cannot be set differently.
Allow exploding: if not checked, prevents the block from being exploded.
Block unit: set the insertion unit for the block (see also: To insert a block).
Set the behavior of the selected entities after the block is created:
Retain: The selected entities remain in the drawing.
Convert to block: The selected entities are replaced by the newly created block.
Delete: The selected entities are deleted.
Click the OK button to create the block.
|
NOTE |
If the selected entities were erased by setting the Delete option in step 6, you can bring back the selected block entities by typing oops in the command bar, then press Enter. |
To create a block using the Blocks Explorer
Do one of the following:
Choose Blocks... in the Settings menu.
Type explblocks in the command bar, then press Enter.
The Drawing Explorer - Blocks dialog opens.
In the Drawing Explorer dialog do one of the following:
Click the New
button (![]() ) on the Details toolbar.
) on the Details toolbar.
Choose New in the Edit menu.
The Drawing Explorer dialog closes.
The command bar reads: Insertion point for new block:
Specify the insertion point of the new block.
The command bar reads: Select entities for block.
Select the entities for the new block.
Right click to create the block.
The selected entities are removed from the drawing.
The Drawing Explorer dialog
reopens.
The Name field of the new block is
selected.
Type a name in the Name field, replacing the default NewBlock1 name.
Close the Drawing Explorer dialog.
(option) Type oops in the command bar, then press Enter to bring back the selected block entities.
To save a block to a separate file
Do one of the following:
Click the Save
Block... tool button (![]() ) on the Tools toolbar.
) on the Tools toolbar.
Choose Save Block... in the Tools menu.
Type wblock in the command bar, then press Enter.
The Write Block to File dialog opens.

Click the browse button (![]() ) next to the Name and path
field.
) next to the Name and path
field.
The Save Block dialog opens.
On the Save Block
dialog, select a folder and type a name in the File name field, then click the Save button.
The Save Block dialog closes.
Insert units: set the insertion unit for the block (see also: To insert a block).
To select the source entities for the new block, do one of the following:
Click the Block radio button, then select a block from the drop-down list.
Click the Model space radio button, to select all the entities in the model space of the current drawing.
Click the Entities radio button, then click the
Select Entities button (![]() ).
).
The Write Block to File dialog
temporarily closes to let you select entities in the drawing.
Right click to stop selecting entities.
Click the Pick point button
(![]() ) to define the Base
point of the new drawing
) to define the Base
point of the new drawing
or
Type the coordinates of the base point in the X-, Y- and
Z-field.
Set the behavior of the selected entities after the block is
created:
Retain: The selected entities remain in the drawing.
Convert to block: The selected entities are replaced by the newly created block.
Delete: The selected entities are deleted.
Click the OK button to create the drawing file.
| © Menhirs NV. All rights reserved. |