Commands: PLOT, PRINT and QPRINT
The Plot command plots drawings to printers and to files, through prompts at the command bar; this command is meant for scripts and routines.
The Print command prints drawings to plotters and files through a dialog box.
The Qprint command prints the drawing with the default plot configuration, without displaying the Print dialog box (short for "quick print").
A standard print procedure consists of the following steps:
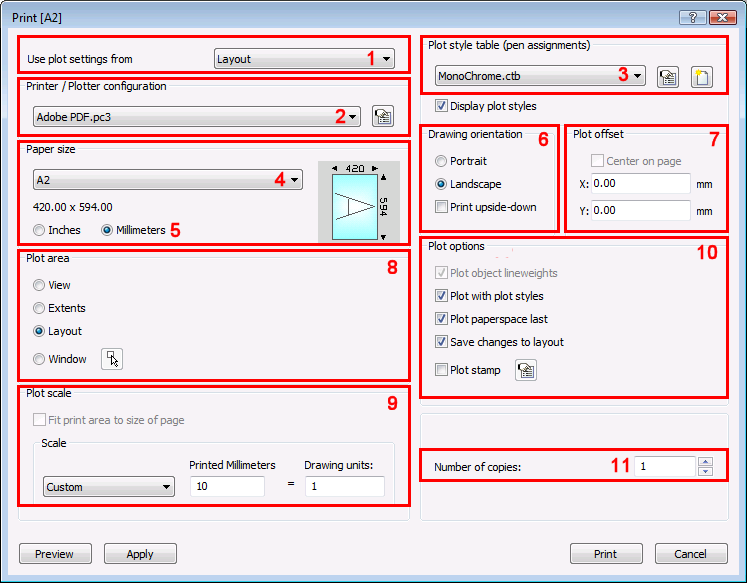
Open the Print dialog.
Select either Previous plot or Layout. (1)
Choose a Printer or Plotter Configuration. (2)
Choose a Plot style table. (3)
Choose a
Paper Size. (4)
The image reflects the position and orientation of the drawing on
the selected paper size.
Choose the Paper Units. (5)
Choose the Drawing Orientation.(6)
Define the Plot offset. (7)
Specify the Area to plot. (8)
Define the Plot Scale. (9)
Check the Plot Options. (10)
Specify the Number of copies. (11)
Click the Preview button to see a preview of the plot output.
When in a layout, click the Apply button to update the layout.
Click the Print button to start printing.
|
NOTE |
All print settings and options are saved in the Model and each of the Layouts. |
Do one of the following:
Choose Print... in the File menu.
Type print in the command bar, then press Enter.
|
NOTE |
If you click the Print ( |
Press the down arrow, then select the paper size in the Paper Size list.
The available sizes depend on the selected printer.
Select either Inches
or Millimeters.
The paper size image indicates the size, position and orientation of the plot area on the selected paper size.
|
NOTE |
The Scale and Plot offset setting units are changed according to the chosen Paper units. |
To choose the drawing orientation
Select either Portrait or Landscape.
Portrait: The drawing or layout x-axis is aligned with the shortest edge of the selected paper size.
Landscape: The drawing or layout x-axis is aligned with the longest edge of the selected paper size.
The paper size image changes accordingly.
When in a layout, click the Apply button to update the display.
Select either Center on page
or
type the plot offset in the X: and Y: fields.
The offset is calculated from the bottom left corner of the paper.
When in a layout, click the Apply button to update the display.
|
Option |
Result |
|
View |
Prints the portion of the drawing that displays in the current viewport or a saved view. |
|
Extents |
Prints all entities in the drawing |
|
Limits |
Prints to the limits defined in the drawing This option is only available when printing in Model space. |
|
Layout |
Prints the current layout. This option is only available when printing in Paper space. |
|
Window |
Prints the portion of the drawing contained in a user defined window, maintaining the aspect ratio of the windowed area to the drawing. Click the Select print area button
( or Type the the X- and Y-coordinates of the corners of the print area in the X: and Y: fields.
|
If you print in paper space, the final scale of the plot output is the product of the viewport scale and the plot scale.
In order to keep control over the scale of the plot output:
Specify the width and height of the viewports in drawing units.
Set the scale of each viewport to the scale you want in the plot output.
The plot scale reflects the relationship
between paper units and drawing units. (see table below)
|
Paper units |
Drawing units |
Plot scale |
|
mm |
mm |
1 |
|
mm |
cm |
10 |
|
mm |
m |
100 |
If you print in model space, the scale of the plot output equals the plot scale, on condition your drawing units equal the paper units. Otherwise you need to multiply the plot scale with respect to the relationship between paper units and drawing units.
Click to toggle the plot options On / Off.
|
Option |
Effect |
|
Plot object lineweights |
If Plot with plot styles is off, object lineweights are plotted. |
|
Plot with plot styles |
Settings of the assigned STB or CTB file are used. |
|
Plot paperspace last |
Entities in Model space are plotted first, paperspace entities last. |
|
Save changes to layout |
All changes made in the Print dialog are saved in the layout. This option toggles the Save changes to layout variable. |
|
Plot stamp |
Adds a header and / or footer. Click the Edit plot stamp button
(
|
Click the Edit plot
stamp button (![]() ).
).
The Plot stamp dialog opens.
In the Header field, do one of the following:
Type the header text.
Click the down arrow button, then choose a variable in the drop down list.
Type one or more variable names.
Leave the field empty.
In the Footer field, do one of the following:
Type the footer text.
Click the down arrow button, then choose a variable in the drop down list.
Type one or more variable names.
Leave the field empty.
|
Name |
Description |
|
$Name |
Adds the name of the current user, as definied in the User Name field of the License Information. |
|
$Company |
Adds company name of the current user, as definied in the Company field of the License Information. |
|
$Date |
Adds the current date. |
|
$DateTime |
Adds the current date and time. |
|
$DwgName |
Adds the file name and path of the drawing. |
|
NOTE |
The header and footer text is centered by default. The header and footer text can be outlined left
center and/or right by separating the text with commas. In fact the header and footer text consists of three parts, separated by commas. Type a space before one of the commas to leave one of the parts empty, thus outlining the header or footer left or right.
|
To specify the number of copies
Do one of the following:
Type the desired number in the Number of copies field.
Click the up-arrow and the down-arrow buttons to specify the number of copies.
To see a preview of the plot output
Do one of the following:+
Click the Preview button on the Print or Page Setup dialogs.
Choose Print Preview... in the File menu.
Type preview in the command bar, then press Enter.
(option) Use the mouse scroll wheel to zoom. Double click the middle mouse button to zoom extents.
To close the Print Preview window, do one of the following:
Click the Close button to return to the drawing window.
Click the Print Settings... button to open the Print dialog.
Click the Print button to start printing.
| © Menhirs NV. All rights reserved. |