Editing polyline
vertices
Commands: PEDIT and PEDITEXT
The Edit vertices option of the
Pedit command modifies individual
polyline vertices.
When you select this option, the program switches into a special
vertex editing mode and places an X on the first vertex. The X
indicates the vertex you are editing. The Next and Previous
options move the X to the next or previous vertex. You can edit
only one vertex at a time.
When editing vertices, you can modify the polyline in the
following ways:
The Peditext command is used in
2D Editing command group of the
Quad
cursor menu
Editing a polyline segment using the Quad
- Move the cursor over the polyline.
If currently ON, the
TIPS widget displays:

The available commands in the Quad apply to the entire
polyline.
- Press the Ctrl-key to switch to segment mode.

The available commands in the Quad apply to the segment under the
cursor.
- When the Quad cursor menu
displays, do one of the following:
- Right click to execute the default
Quad command.
- Move the cursor to the Quad and move to the Edit command group.
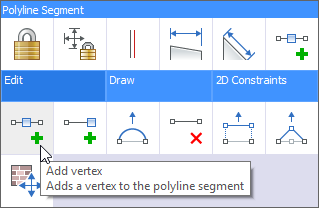
- Select a command:
 Add vertex: adds a vertex to
the segment under the cursor.
Add vertex: adds a vertex to
the segment under the cursor. Add vertex at end: adds as a
new vertex at the end of the polyline.
Add vertex at end: adds as a
new vertex at the end of the polyline.
This option is only available if the cursor is on one of the
endpoints of a polyline. Adjust Bulge:
Modifies the bulge factor of the segment under the cursor.
Adjust Bulge:
Modifies the bulge factor of the segment under the cursor. Delete segment: deletes the
segment under the cursor.
Delete segment: deletes the
segment under the cursor. Stretch segment: moves the
segment under the cursor.
Stretch segment: moves the
segment under the cursor. Stretch vertex: moves the
vertex closest to the cursor.
Stretch vertex: moves the
vertex closest to the cursor.
Starting the polyline
vertex editing mode
- Do one of the following:
- Click the Edit
Polyline tool button (
 ) on the Modify toolbar.
- Choose Edit
Polyline in the Modify
menu.
- Type editpline
or pedit in the command window, then
press Enter.
You are prompted: Select polyline to edit.
- Select the polyline.
You are prompted: Edit polyline: Edit vertices/Close (or
Open)/Decurve/Fit/Join/Linetype-Mode/Reverse/Spline/Taper/Width/Undo/<eXit>:
A prompt menu displays.
- Choose Edit vertices
in the prompt menu or type E and
press Enter.
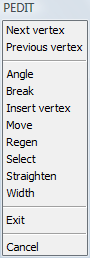
You are prompted:
Next/Previous/Angle/Break/Insert/Move/Regen/SElect/Straighten/Width/eXit/<Next>:
The Editpline prompt menu
changes:
A triangle indicates the start point of the
polyline. The first vertex of the polyline is selected.
Convert a
straight polyline segment into an arc
- Start the
polyline vertex editing mode.
- Select the start vertex of the segment you want to
convert.
Choose Next vertex / Previous vertex in the prompt menu to
select a vertex.
The X indicates the currently
selected vertex.
- Choose Angle in the
prompt menu or type A and press
Enter.
The prompt menu closes.
You are prompted: Included angle for segment (>0 is ccw, 0 is
straight, <0 is cw) <current angle>:
- Type a new included angle for the segment and
press Enter.
The direction of an arc segment is as follows:
- positive angles: counter clockwise
- negative angle: clockwise direction
- 0° for straight segments
- Choose Exit in the
prompt menu or type X and press Enter
to leave the Polyline vertex editing
mode.
- Do one of the following:
- Continue editing the selected polyline.
- Choose Exit in
the prompt menu or press Enter to conclude the Edit Polyline tool.
Break a polyline
into two separate polylines
- Start the
polyline vertex editing mode.
- Select the start vertex where you want to break
the polyline.
Choose Next vertex / Previous vertex in the prompt menu to
select a vertex.
The X indicates the currently
selected vertex.
- Choose Break in the
prompt menu or type B and press
Enter.
You are prompted:
Next/Previous/Select/Go/eXit/<Next>:
The prompt menu changes:

- (option) Do one of the following to select a
second vertex:
- Choose Next
vertex / Previous vertex
in the prompt menu.
- Choose Select
in the prompt menu or type S and
press Enter.
You are prompted to select a vertex.
- Choose Go in the
prompt menu or type G and press
Enter.
The polyline s broken into two polylines.
If a second point is selected in step 4 the segment(s) between the
selected vertices is (are) deleted.
- Choose Exit in the
prompt menu or type X and press Enter
to leave the Polyline vertex editing
mode.
- Do one of the following:
- Continue editing the selected polyline.
- Choose Exit
in the prompt menu or press Enter to conclude the
Edit Polyline tool.
Insert a new vertex in a
polyline
- Start the
polyline vertex editing mode.
- Select the start vertex of the segment where you
want to insert a vertex.
Choose Next vertex / Previous vertex in the prompt menu to
select a vertex.
The X indicates the currently
selected vertex.
- Choose Insert vertex
in the prompt menu or type I and
press Enter.
You are prompted: Location for new vertex:
- Specify the location for the new vertex.
The new vertex is inserted.
- Choose Exit in the
prompt menu or type X and press Enter
to leave the Polyline vertex editing
mode.
- Do one of the following:
- Continue editing the selected polyline.
- Choose Exit in
the prompt menu or press Enter to conclude the Edit Polyline tool.
Move a vertex in a polyline
- Start the
polyline vertex editing mode.
- Select the vertex you want to move.
Choose Next vertex / Previous vertex in the prompt menu to
select a vertex.
The X indicates the currently
selected vertex.
- Choose Move in the
prompt menu or type M and press
Enter.
You are prompted: New location for vertex.
- Specify the new location for the selected
vertex.
The vertex is moved.
- Choose Exit in the
prompt menu or type X and press Enter
to leave the Polyline vertex editing
mode.
- Do one of the following:
- Continue editing the selected polyline.
- Choose Exit in
the prompt menu or press Enter to conclude the Edit Polyline tool.
Delete vertices in a
polyline
- Start the
polyline vertex editing mode.
- Select the vertex before the first vertex you want
to delete.
Choose Next vertex / Previous vertex in the prompt menu to
select a vertex.
The X indicates the currently
selected vertex.
- Choose Straighten in
the prompt menu or type S and press
Enter.
You are prompted: Straighten:
Next/Previous/Select/Go/eXit/<Next>:
- Do one of the following to select the vertex after
the last vertex you want to delete:
- Choose Next
vertex / Previous vertex
in the prompt menu.
- Choose Select
in the prompt menu or type S and
press Enter.
You are prompted to select a vertex.
- Choose Go in the
prompt menu or type G and press
Enter.
The vertices between the selected vertices are removed.
A straight segment is drawn between the selected vertices.
- Choose Exit in the
prompt menu or type X and press Enter
to leave the Polyline vertex editing
mode.
- Do one of the following:
- Continue editing the selected polyline.
- Choose Exit in
the prompt menu or press Enter to conclude the Edit Polyline tool.
Change the width of a
polyline segment
- Start the
polyline vertex editing mode.
- Select the start vertex of the segment you want to
change the width of.
Choose Next vertex / Previous vertex in the prompt menu to
select a vertex.
The X indicates the currently
selected vertex.
- Enter starting width <current width>:
- Do one of the following:
- Type the new width in the command bar and
press Enter.
- Click to define the width graphically.
You are prompted: Enter ending width <current
width>:
- Do one of the following:
- Type the new width in the command bar and
press Enter.
- Click to define the width graphically.
- Choose Exit in the
prompt menu or type X and press Enter
to leave the Polyline vertex editing
mode.
- Do one of the following:
- Continue editing the selected polyline.
- Choose Exit in
the prompt menu or press Enter to conclude the Edit Polyline tool.
|
NOTE
|
The new width is applied when you conclude the
Edit Polyline tool in step 6.
|
|
© Menhirs NV. All rights reserved. |