![]()
![]()
![]()
Inserts blocks, through a dialog box and prompts for attribute values through the command bar or a dialog box.
Accessing the Command
command bar: insert
aliases: i, ddinsert
menu bar: Insert | Insert Block
toolbar: Insert | ![]()
: insert
Displays a dialog box:
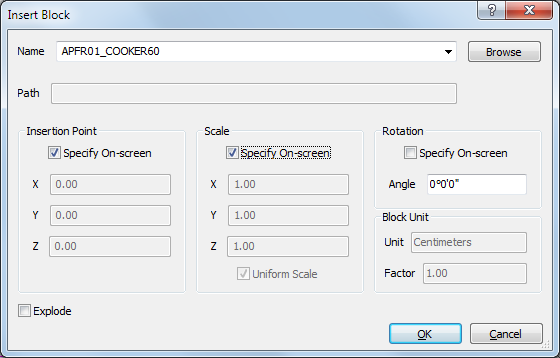
Enter options, and then click OK.
Command Options
|
Option |
Description |
|
Specifies the name of the block. The block can exist in the drawing, or be any DWG file:
Blocks are created with the Block command. |
|
|
Displays the Open dialog box. Choose a DWG file, and then click Open. |
|
|
Reports the path to the block, if opened from a DWG file. |
|
|
|
|
|
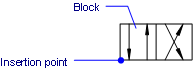
Specifies the insertion point of the block in the drawing.
|
|
|
Toggles where you specify the insertion coordinates:
Insertion point - specify the x,y or x,y,z coordinates of the block's lower left corner. |
|
|
Specifies the x-, y- and z- coordinate of the block's insertion point. |
|
|
|
|
|
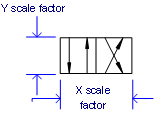
Scales the block:
|
|
|
Toggles where you specify the scale factors:
Scale factor - specify the scale factor. |
|
|
Defines the scaling of the block:
|
|
|
Toggles whether or not the same scale factor is used for all:
|
|
|
|
|
|
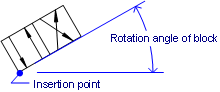
Specifies the rotation angle of the block about its insertion point:
|
|
|
|
Toggles where you specify the rotation angle:
Rotation angle - specify the angle. |
|
Specifies the rotation angle about the insertion point:
|
|
|
|
|
|
Toggles whether the block is inserted exploded:
|
|
|
|
|
|
Controls the automatic scaling of the block with respect to the INSUNITS system variable of the current drawing. |
|
|
Unit |
Shows the INSUNITS setting of the inserted block or drawing. |
|
Factor |
Shows the calculated scaling factor with respect to the INSUNITS setting of the inserted block (or drawing) and the current drawing. |
|
|
|
|
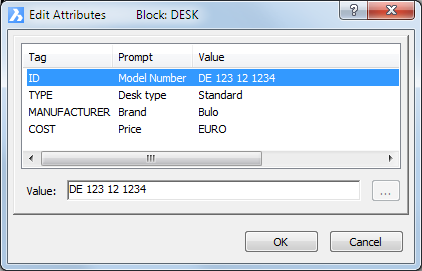
If the block contains attributes, the value of the ATTDIA (Attribute Dialog) system variable determines whether you are prompted in the command bar to set the attributes or through a dialog box. |
|
|
ATTDIA = ON |
A dialog box displays:
Select an attribute in the list, then define the attribute in the Value field. |
|
ATTDIA = OFF |
You are prompted in the command bar: <Attribute Prompt> <Default Text>: Type a new value at the command prompt or press Enter to accept the default value. |
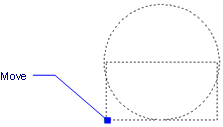
Grips Editing
Blocks can be edited directly through grips:
Select the block. Notice that it has one grip located at the insertion point.
Drag the grip to move the block.
Procedures
General procedure to insert a block
To insert a block using the Drawing Explorer
To insert a block aligned with an entity
Placing blocks with attributes
Related Commands
-Insert - insert blocks and prompts for attribute values through the command bar or a dialog box.
InsertAligned - inserts blocks repeatedly, and inserts mirrored blocks.
MInsert - inserts a block as a rectangular array
PasteBlock - pastes entities from the Clipboard as blocks.
WBlock - writes blocks and other drawing parts to files on disk.
XAttach - attaches externally-referenced drawings through a dialog box.
AttDef - defines attributes through a dialog box.
-AttDef - defines attributes through the command bar.
AttRedef - redefines a block and updates associated attributes.
AttSync - synchronizes attribute definitions in all block references of a specified block definition.
BattMan - manages the attributes of a block definition.
Block and -Block - create blocks from attribute definitions and entities.
EAttEdit - edits attribute values and most properties.
Explode - reduces blocks to constituent entities and attributes to tags.
Pdfattach - inserts a PDF file as an underlay into the current drawing; displays dialog boxes.
-PdfAttach - inserts a PDF file as an underlay into the current drawing; displays prompts in the command bar.
Properties - edits block and attribute values and properties.
RefEdit - edits blocks and attributes in-place.
| © Menhirs NV. All rights reserved. |