![]()
![]()
![]()
Fills closed areas with repeating patterns; displays prompts at the command bar.
Accessing the Command
command bar: -hatch
aliases: -bh, h, -bhatch
Quad: 2D Editing | ![]()
: -hatch
Prompts you in the command bar:
Current hatch pattern: ANSI31
Specify internal point or [Properties/Select/Remove/Advanced/Draworder/Origin/ANnotative/Layer/Transparency/Undo]: (Pick a point, or enter an option.)
Selecting everything visible...*
Specify internal point or [Properties/Select/Remove/Advanced/Draworder/Origin/ANnotative/Layer/Transparency/Undo]: (Pick another point, or enter an option, or press Enter to create the hatch.)
* Entities which are not visible in the current viewport when the command is launched cannot be selected. Partly visible entities can be selected though.
Examples of hatch patterns.
Command Options
|
Option |
Description |
|
Reports the name of the current hatch pattern; you can change the pattern name with the Properties option. |
|
|
Pick a point inside a closed area; BricsCAD creates an invisible boundary, and then hatches the area. You can pick more than one area to hatch at a time. |
|
|
Enter a pattern name |
Specifies the name of the hatch pattern. |
|
? to list patterns |
Lists the names of all patterns; reminds you of their names. Press F2 to see the list in the prompt history window. |
|
Solid |
Specifies a solid filled hatch. |
|
User defined |
Allows you to define simple hatch patterns based on angle, scale, and crosshatching. |
|
Proceed |
Skips the next two prompts, and returns to the original prompt. |
|
Scale for pattern |
Specifies the scale factor of the hatch pattern. The scale factor is usually the same as that of text and linetypes. |
|
Angle for pattern |
Specifies the angle at which the pattern is drawn. |
|
|
|
|
User Defined |
|
|
Proceed |
Skips the following prompts, and returns to the original prompt. |
|
Space between standard pattern lines |
Specifies the distance between hatch lines. |
|
Angle for lines |
Specifies the angle at which the pattern is drawn. |
|
Cross-hatch area? |
Applies the pattern a second time at 90 degrees to the first. |
|
|
|
|
Prompts you to select the entities making up the boundary: Select entities - select one or more entities. Select entities - press Enter to return to original prompt. |
|
|
Allows to remove boundary entities. Prompts you to select island (interior) entities, which will be hatched through. |
|
|
|
|
|
Prompts you: Enter an option [Boundary set/Retain boundary/Island detection/Specify style/Set associativity(A)/Boundary tolerance(T)/Seperate hatches(H)]: |
|
|
Specifies the entities to consider for creating boundaries: Specify candidate set for boundary [New selection/All objects(E)]<Everything>: - enter Y or N.
|
|
|
Determines whether the temporary boundary created by BricsCAD is retained after the command ends: Retain derived boundaries? [Yes-Retain boundariess(Y)/No-Discard boundary(N)]<No>: - enter Y or N.
|
|
|
Toggles whether islands are hatched over or not: Do you want island detection? [Yes-Detect islands(Y)/No-Set ray casting(N)]<Yes>: - enter Y or N.
|
|
|
Specifies how islands are treated: Enter hatching style: [Nested/Outer/Ignore]<Nested>: - enter N, O, or I.
|
|
|
Toggles whether hatches are associative: Associativity hatch? [Yes-Associative hatch(Y)/No-Nonassociative hatch(N)]<Yes>: - enter Y or N.
|
|
|
Specifies the largest gap that BricsCAD will close when hatching open areas: Specify a boundary gap tolerance value <0>: - enter a value. |
|
|
Create separate hatches? [Yes/No-Do not separate(No)]:<No>: - enter Y or N.
|
|
|
|
|
|
Specifies whether the hatch pattern appears visually above or below overlapping entities. Prompts you: Enter an option [None/Send to back(B)/Send to front(F)/Send behind boundary(H)/Bring in front of boundary(D)]: - enter an option.
|
|
|
Prompts for a new hatch origin point: New value for the hatch origin <0.0000,0.0000>: - enter x,y coordinates, or pick a point in the drawing. Use entity snaps to pick the origin accurately. |
|
|
Sets the Annotative property of the hatches. Applies the current annotative scale (see the CANNOSCALE system variable). Prompts you: Create annotative hatch [Yes/No] <No> - type Y or N.
|
|
|
Allows to create the hatch on a specified layer, rather than on the current layer. Prompts you: Specify layer or . for use current <.>: Type the name of the layer you want to create the hatch entity on or press Enter to create the hatch on the current layer. |
|
|
Allows to set the Transparency property of the hatch. Prompts you: Specify transparency [0/90/ByLayer(L)/ByBlock(B)/. for use current(.)] <Use current>: - enter an option.
The Transparency value for new hatches is saved by the HPTRANSPARENCY system variable. |
|
|
Allows to remove already selected boundaries from the selection. |
|
Procedures
Defining the MEASUREMENT setting
General procedure to create hatches and gradient fills
To define the boundary for a hatch or gradient fill
To edit a hatch or gradient fill
Grips Editing
Hatches can be edited directly through grips:
Select the hatch.
Notice that it has one central grip (1), grips on each boundary
vertex (2) and grips in the midpoint of each boundary segment (3
and 4).
Drag the central grip (1) to move the hatch.
Drag a vertex grip (2) or a midpoint grip (3 and 4) to change the hatch boundary.
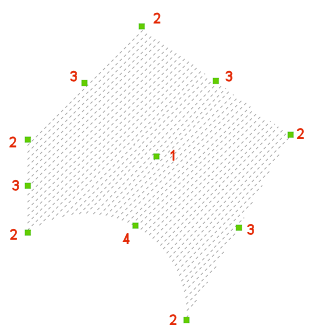
1. Center grip: moves the hatch
2. Vertex grip: moves the vertex
3. Midpoint grip: moves the boundary segment
4. Arc midpoint grip: modifies the arc radius
Related Commands
Hatch - place hatch patterns through a dialog box.
Boundary and -Boundary place a polyline boundary inside closed areas.
HatchEdit - edits hatches and gradient fills in a dialog box.
-HatchEdit - edits the boundaries of hatch and gradient entities; displays prompts in the command bar.
HatchGenerateBoundary - generates a boundary around a hatch or gradient fill.
Properties - changes the properties of hatch patterns.
Settings - specifies the default parameters for hatch patterns.
Solid - draws 3- and 4-side solid-filled areas.
| © Menhirs NV. All rights reserved. |