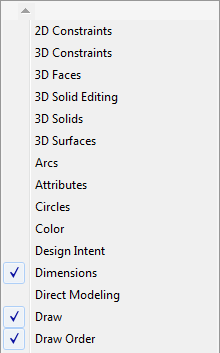
2D Constraints


3D Solid Editing

3D Solids


BIM (*)
Chapoo


Entity Data


Insert
Look From
(*) Replaced by the Look From control.
Meshes


Sections
Selection Modes (*)


Standard

Tools


The following toolbars are available in BricsCAD.
Some of the tools are available in BricsCAD Pro and/or BricsCAD Platinum only. Please see the Command Reference guide for more information.
(*) These toolbars are new in BricsCAD V15.
|
2D Constraints |
|
|
|
|
|
3D Solid Editing |
|
|
3D Solids |
|
|
|
|
|
BIM (*) |
|
|
Chapoo |
|
|
|
|
|
|
|
|
|
|
|
|
|
|
|
|
|
|
|
|
|
|
|
|
|
|
Entity Data |
|
|
|
|
|
|
|
|
|
|
|
Insert |
|
|
|
|
|
Look From |
(*) Replaced by the Look From control. |
|
|
|
|
|
|
|
Meshes |
|
|
|
|
|
|
|
|
|
|
|
Sections |
|
|
Selection Modes (*) |
|
|
|
|
|
|
|
|
Standard |
|
|
Tools |
|
|
|
On some tool buttons a small black arrow at the bottom right corner of the icon indicates a flyout is available. A flyout holds a group of related tools. Press and hold the left mouse button to expand the flyout and choose one of the flyout tools. The tool that was last chosen remains visible in the collapsed toolbar.
Each of the flyouts can be opened as a separate toolbar. Drag the button of a toolbar flyout into the drawing area to open it as a floating toolbar.
|
Parent |
Flyout |
|
|
Lines |
|
|
|
|
Polylines |
|
|
|
Polygon
|
|
|
Meshes |
3D Faces
|
|
|
|
3D Surfaces |
|
|
|
||
|
|
||
|
Tools |
|
|
|
|
||
|
|
|
|
|
|
|
|
|
|
|
|
|
|
|
|
|
|
|
|
|
Mechanical Visualization |
|
A context menu displays.
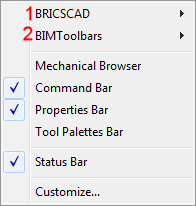
(1)
Main CUI file.
(2)
Partial CUI file(s)
|
NOTES |
|
|
NOTE |
Floating toolbar can be closed by clicking the
Close button ( |
You can choose between small (16 x 16) or large (32 x 32) icons on toolbars.
To set the position and visible property of a toolbar
The Visible property determines whether a toolbar is visible when a cui-file is loaded.
The Position property determines where a toolbar displays when a cui-file is loaded.
| © Menhirs NV. All rights reserved. |